20 Best Leg Exercises to Forge Muscle, Power and Strength
Leg exercises are necessary to build power, strength and muscle.
The following leg exercises have been arranged into four sections involving squatting movements, unilateral movements, posterior chain development and push/pull specific movements such as sled pulls.
A few of these leg exercises could be included in multiple categories (such as pistol squats for example) but in the interest of clarity they have been sorted accordingly based on the principle of movement first. Browse through to find new leg exercises to add into your training.
- LEG MUSCLES
- SQUATTING LEG EXERCISES
- BACK SQUAT
- FRONT SQUAT
- BULGARIAN SPLIT SQUAT
- GOBLET SQUAT
- COSSACK SQUATS
- PISTOL SQUATS
- UNILATERAL (SINGLE) LEG EXERCISES
- BARBELL LUNGE
- LEG EXERCISES – REVERSE BARBELL LUNGE
- SINGLE ARM KETTLEBELL OVERHEAD LUNGE
- DUMBBELL BOX STEP OVERS
- DEDLIFTING LEG EXERCISES
- DEADLIFT
- LEG EXERCISES – ROMANIAN DEADLIFT
- LEG EXERCISES – SUMO DEADLIFT
- SINGLE LEG DEADLIFT
- DEFICIT DUMBBELL DEADLIFT
- LEG EXERCISES – GLUTE HAM RAISES
- PUSHING AND PRESSING LEG EXERCISES
- SLED PUSHES
- LEG EXERCISES – SLED PULLS
- LEG EXERCISES – LEG PRESSES
- LEG EXTENSIONS
- LEG EXERCISES
LEG MUSCLES
The legs contain a selection of the largest muscles in the body. The anterior muscles (found on the front of the legs) such as the quadriceps femoris, iliopsoas, and sartorius, work as a group to flex the thigh at the hip and extend the leg at the knee.
Posterior muscles such as the hamstrings and gluteus maximus (found on the back of the legs) produce the opposite motion, extension of the thigh at the hip and flexion of the leg at the knee.
Lateral muscles, such as the gluteus medius, abduct the thigh (move the leg outward to the side) at the hip while the medial groin muscles adduct the thigh (move the leg back towards the body).
All of these muscle groups provide powerful contractions to power and move the body whilst making fine adjustments to maintain posture and balance. Functional, strong and mobile legs will enable you to walk further through the mountains and natural world, run and cycle faster, improve all round athletic performance and enjoy life in general. Many gym goers neglect their legs, which is foolish as we all know that you should never skip leg day.
SQUATTING LEG EXERCISES
“The squat is a beautiful, natural movement. It demands midline stabilization, posterior-chain engagement and core-to-extremity movement, and it can be used to move your body weight or very large loads held in a variety of positions. At one end of the spectrum, the squat is an essential component of weightlifting and powerlifting, and at the other end, the squat is essential to getting off a toilet seat. Regardless of what the problem is, the answer is to squat.”
The barbell back squat is probably the most important and useful exercise that exists. Mark Rippetoe sums up the benefits perfectly in the following quote.
“There is simply no other exercise, and certainly no machine, that produces the level of central nervous system activity, improved balance and coordination, skeletal loading and bone density enhancement, muscular stimulation and growth, connective tissue stress and strength, psychological demand and toughness, and overall systemic conditioning than the correctly performed full squat.”
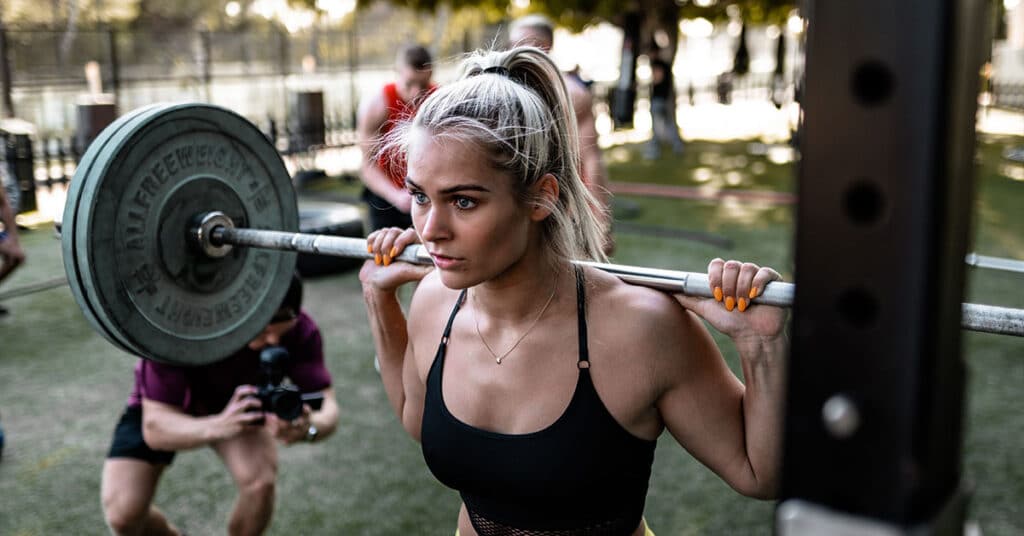
BACK SQUAT
Benefits of the Back Squat
The back squat is the king of strength and leg exercises and an essential compound exercise for building leg strength, power and physique.
Squats are one of the most effective weight training exercise you can do because they work more muscles, over a longer range of motion and with more weight than any other exercise. Here are a few benefits of squats:
- Gain strength
- Build muscle
- Burn fat
- Increase power
- Strengthen bones
- Strengthen joints
- Increase flexibility
- Improve balance
Squats also build discipline and mental resilience. Squats are hard and there are no shortcuts to getting strong. Working through a squat program takes guts and determination. It forces you to do what you need to do, when it must be done, even when you don’t want to. This promotes traits of discipline and mental strength that will transfer over into other areas of your life such as sticking to good nutrition habits, going to bed on time, doing the work, and so on.
How to do the Back Squat
- Rack the barbell behind your neck. Retract your shoulder blades tightly and rest the bar in the natural shelf of the upper traps
- Place your feet between hip and shoulder width with the toes turned slightly out.
- Inhale and forcefully tighten your core musculature and glutes. Grip the barbell as tightly as possible
- Bend at the knees and hips simultaneously. Descend into the bottom position of the squat with an upright posture. Maintain tension on the legs throughout the movement and control the speed of the descent
- Full depth is achieved when the knees are closed as much as possible without losing the arch in the back (if you cannot sit into a full depth squat, you need to work on mobility). You must break parallel with your hips below your knees else the rep counts as a partial rep
- Once in the bottom position, stand up as aggressively as possible, again with the knees and hips together to maintain your upright posture. Grip the bar tight and push it upwards. Lead the movement with your head and shoulders. Don’t let your knees cave inwards.
Leg Exercises – Training Tips for the Back Squat
Keep your lower back neutral, don’t let it round.
If the weight causes you to fall forward or round your back then it is too heavy.
Don’t let your knees cave inwards. If this is constantly happening, drop the weight and build up strength and form over time.
Go as low as you can. Always put form first and make sure to ALWAYS squat below parallel unless you are specifically training partial squat movements. If you aren’t sure, film yourself and judge harshly. If in doubt, go lower.
FRONT SQUAT
Benefits of the Front Squat
The front squat provides an alternative stimulus to the back squat as the load is carried in the front rack position. This exercise requires a strong upper back, solid core and powerful quads to maintain an upright torso and position throughout the full range of motion.
The front squat is an excellent exercise to build strength and muscle in the glutes, core, abs, spinal erectors, upper back and quads.
This movement can also add serious amounts of muscle mass to the quadriceps and enhance overall leg development and performance, especially if athletes find their hips become the primary mover in most squats. A lack of strength and control in the quads can impede knee flexion and mobility, creating a cascade of countering movement imbalances throughout the hips, spine, and ankles.
The front squat naturally limits poor technique to a much greater extent than the back squat because the bar will simply fall from the front rack position if the back rounds or the core weakens.
How to do the Front Squat
- Set the barbell in the front rack position, resting on the front deltoid
- Select a grip that feels comfortable
- Set your elbow position as high as possible
- Inhale, brace your core and glutes and grip the barbell tightly
- Set your squat stance width
- Breathe and brace your core again before descending into the front squat
- Break at your hips and knees at the same time to initiate the movement
- Use a tempo that allows you to maintain tightness and control at all times. You should always be in full control of the movement
- Ensure your knees are tracking over your toes
- Maintain an upright torso and braced core
- Go as deep as your mobility allows. You must break parallel
- Push your knees forward in the bottom of the squat
- Drive your feet through the floor and use your quads to drive the weight upwards
- Push your elbows up and forward to prevent the barbell slipping or falling forward
- Accelerate through the entire range of motion to a fully extended standing position
Training tips for the Front Squat
Most people struggle to grip the barbell properly in the front rack position. If this is the case, spend time working on wrist, shoulder and upper back mobility. Try extending the warm up to incorporate these elements.
It is perfectly acceptable to grip the barbell in other ways.
Standard grip – let the barbell rest on your fingertips and apply the pressure between your fingertips and the barbell. In this grip you should be able to press all four fingers into contact with the barbell.
Modified standard grip – Depending on your level of wrist and shoulder mobility, and the length of your forearm, you might find it easier to place your hands slightly wider than shoulder-width apart. Try experimenting with placing your hands several inches away from your shoulders and see what works best for you. In this grip, you may only be able to get 2-3 fingers to make contact with the barbell.
Cross arm grip – This is often a much more comfortable position for bigger lifters with a lot of arm muscle or athletes with severe mobility restrictions. If you are unable to perform the front squat with either of the above grip variations because of the reasons listed here then use the cross arm grip. Cross your arms across your chest and grab the barbell with an overhand grip inside the shoulders. Perform the front squat as normal.
BULGARIAN SPLIT SQUAT
Benefits of Bulgarian Split Squats
Bulgarian Split Squat are a tried and tested way to develop single-leg strength, power and balance through a full range of motion. They will expose weaknesses in your movement, mobility and strength, as well as building significant muscle on the legs and glutes.
The Bulgarian split squat is an exceptionally user-friendly exercise. Whatever your current fitness level you can add this into your training and simply adjust the load to suit your goals. Because you’re not loading the spine as heavily as you would with a back squat, recovery doesn’t take as long, so you’re able to perform them with greater frequency, potentially leading to greater strength and size gains.
Bulgarian Split squats will also create substantial benefits for your coordination and proprioception.
They can be performed with or without dumbbells.
How to do Bulgarian Split Squats
- Place a small pad or folded towel in front of a standard weights bench (optional)
- Deadlift two dumbbells into a fully extended standing position. Let your arms hand by your sides and grip the dumbbells tightly
- Stand in front of the pad facing away from the bench, stretch and raise your right leg behind you until the the top of your foot (or the laces of your shoe) rest on the top of the bench
- Inhale and brace your core and glutes
- Descend with your left leg until your back knee touches the pad. Make sure to keep the torso upright
- Ascend to the starting position. don’t let your knee cave inwards at any time during the Bulgarian split squat
- Repeat
Leg Exercises – Training Tips for the Bulgarian Split Squat
The Bulgarian split squat takes time to get into the set-up position so it usually makes most sense to complete all the reps in a single set with one leg before switching and completing them with the other.
The closer you stand to the bench, the more the movement will emphasize the quads. However, standing too close to the bench may make it harder to stay upright. This is also dependent on your mobility.
Standing too far away can cause pain in the groin and hip flexor of the rear leg and lead to excessive arching of the lower back. You should feel a slight stretch in the rear hip flexor, but no pain. If you feel pain, try using a shorter bench so the stretch isn’t as extreme because your foot is raised as high.
The best solution is to experiment and find the right distance that works for you.
Variations of the Bulgarian Split Squat
If you are new to Bulgarian split squats then perform them with no extra weight first. This will help you understand the mechanics of the exercise.
Move onto the next stage by holding a single light dumbbell or kettlebell in the front rack position.
From here you can progress onto the typical Bulgarian split squat described in the technique bullet points above.
You can also load up with a barbell to keep the exercise varied, or to add more weight without placing as much emphasis on grip strength. Heavier dumbbells are harder to hold for longer in comparison to racking the barbell on your shoulders. The barbell also shifts the weight to a new position, so this provides a new stimulus for your body, strength, power and balance.
GOBLET SQUAT
Benefits of the Goblet Squat
Essentially a front-loaded air squat, the goblet squat is named after the manner in which you grip the weight in front of your chest with your hands cupped, like holding a goblet.
The goblet squat is a great exercise for increasing postural performance, training around an injury, improving squat mobility or simply getting back to basics and dialling in squat technique at the most fundamental level.
With such minimal loads, you can perform higher sets and use the movement to develop conditioning.
Leg Exercises – How to do the Goblet Squat
- Start with a light dumbbell or kettlebell. Cup and hold it vertically at one end. Grip it tightly against your chest
- Point the elbows down. Place feet roughly shoulder width apart. Point toes out slightly (around 15 degrees)
- Inhale, brace the core and glutes
- Break at the hips and knees to begin the movement
- Lower your body into a squat. Maintain a neutral head position
- Keep your torso upright with your shoulders pulled back
- Keep the weight on your heels and your core tight
- Break parallel
- Allow the elbows to brush the insides of your knees as you descend
- Explode upwards to a fully extending standing position. Exhale.
Training Tips for the Goblet Squat
Don’t let your knees cave in at any point.
Concentrate on firing your quads and glutes.
Be critical of your technique. Use the movement to get better by analysing and improving weaknesses in you squat movement.
Dan John’s method to find the right foot positioning for your squat
“First, do three consecutive vertical jumps, then look down. This is roughly where you want to place your feet every time you squat.
Set your feet and bend your hips and knees to lower your body as far as you can. Then, when you’re in your deepest position, push your knees out with your elbows. Try to keep your feet flat on the floor and allow your butt to sink below knee height.
Relax in this position for two or three seconds, then descend a bit deeper and drive your knees out with your elbows once more.
For most men, this small elbow manoeuvre will simplify squatting forever, because it makes you drop your torso between your thighs rather than fold at the waist.”
COSSACK SQUATS
Benefits of Cossack Squats
Squats, lunges and the majority of other leg exercises work the legs up and down and/or forwards and backwards. These types of movements operate along the sagittal plane of motion.
Cossack squats work the much less common side-to-side movement along the frontal plane of motion. Cossack squats work the quads, hamstrings, glutes, calves, core, postural muscles of the back, adductors and hip flexors.
They also improve the health of your joints, identify and prevent imbalances, and enhance multi-planar performance.
The Cossack squat can be used as a warm up, corrective exercise, mobility exercise, active recovery, and assistance exercise. Depending on your ability to perform the movement through the full range of motion with control, you then can add variations, loading, and increase the intensity and complexity of the movement.
Leg Exercises – How to do Cossack Squats
- Adopt a wide stance so that your legs form a triangle with the ground. Keep them straight. Make sure your toes are pointed straight ahead
Inhale, brace your core and glutes - Move your weight to your right leg, bend the right knee and sit back as far as you can as you descend
- Your left leg should remain straight (extended) while your left foot rotates on the heel. Keep the toe pointed up
- Keep the right heel on the ground and maintain an upright torso
- Pause at the bottom of the descent, exhale and push back up to the starting position
- Repeat using the opposite leg
PISTOL SQUATS
Benefits of Pistol Squats
Pistol squats work the quads, core stabilisers (abs and obliques) gluteals and ankle stabilisers.
They also improve unilateral strength, balance and full body coordination, build better joint integrity and movement and enhance muscular activation. Pistols are difficult to master, and will unfailingly expose weak spots in the leg strength and mobility of all athletes.
It is a good athletic achievement to learn how to perform honest, full range of motion pistol squats on both legs.
How to do Pistol Squats
- Stand on the right leg. Point the toes pointed forward and/or slightly outwards to about 15 degrees
- Inhale and brace. Flex the right leg and active the core and hip flexors
- Find a strong centre of gravity and point of balance over the right foot
- Descend slowly into a full depth squat. Ensure that the torso maintains a slight forward lean and keep the back as straight as possible. Keep the left leg straight.
- Once you have assumed a solid deep squat position, press into the floor with your right foot and and push your body upwards back to the starting position
- Assume a stable and fully supported (knee and hip extended) standing position on the working leg
- Alternate legs and repeat
Training Tips for Pistol Squats
If you are a beginner to the pistol squat then it is recommended not to try and catch the bounce aggressively out of the bottom of this movement.
Try holding your toe on the leg that is not active in order to maintain better balance.
Make sure your knees never cave inwards.
Keep your core tight at all times to provide powerful force throughout the entire movement.
Leg Exercises – Pistol Squat Progressions
Pistol squats are an advanced exercise that many people need to work on considerably in order to be able to perform properly. The following progressions and tips may help you build up the necessary strength, balance and mobility to achieve full range of motion throughout the entire movement.
- Step in pistol squats
- Candlestick pistol squats
- Box pistol squat
- Pistol Squat with elevated heel
- Pistol squat hold
- Pistol squat holding a dumbbell or kettlebell
UNILATERAL (SINGLE) LEG EXERCISES
BARBELL LUNGE
Benefits of the Barbell Lunge
The barbell lunge is an effective, single-leg strength exercise that works the quads, glutes, and hamstrings. This exercise will also improve hip mobility, core stability and muscular balance on both sides of the body.
How to do the Barbell Lunge
- Rack the barbell across your back in a high bar position, as you would for a high bar back squat
- Inhale, brace your core and glutes and grip the barbell as tightly as possible
- Step forward with your right foot and descend into a lunge, control the movement at all times
- Descend until your left knee touches the floor
- Pause, then push the ground away from you with your right foot and drive your body back up to the starting position. Keep the hips loaded underneath the torso, and make sure that the weight is properly dispersed in the right heel and midfoot
- Repeat with other leg
Training Tips for the Barbell Lunge
Make sure you descend into the lunge by dropping your hips, rather than jutting the knee forward
Do not let your front leg’s knee cave inward
Maintain a vertical torso at all times
Don’t let your front knee extend out over your toes at the bottom of the rep
LEG EXERCISES – REVERSE BARBELL LUNGE
Benefits of the Reverse Barbell Lunge
The barbell reverse lunge targets, strengthens and impoves the quads, glutes, calves and hamstrings. A great accessory movement for squats, it also tests and enhances hip and ankle mobility, as well as working effectively as an excellent core, ab and oblique strengthening exercise.
Using a barbell allows you to load the exercise beyond body weight and complete the movement in strength or muscle-focused rep ranges. It is also a joint friendly lower-body exercise that will help to build better full body balance and coordination. Many lifters find it more knee-friendly than forward or walking lunges.
The reverse lunge places less emphasis on the quads than the forward lunge, so keep this in mind when you add it into your training, depending on what you wish to achieve.
How to do the Reverse Barbell Lunge
- Rack the barbell on the shelf of your upper back/traps, similar to how you would rack a back squat
- Inhale and brace your core, abs, glutes and tighten your grip on the barbell
- Set the back and place the majority of the loading in your right leg. Break at the hips then step your left leg backwards
- Descend until the right leg touches the floor. Keep the hips underneath the torso. Feel the weight properly dispersed across your right heel and midfoot.
- Powerfully explode upwards. Push the floor away from you with your right leg
- As you stand back up, bring your left leg back to the original position. Fully extend
- Repeat
Training Tips for the Reverse Barbell Lunge
Maintain a vertical torso at all times.
Don’t let the knees cave inwards at any time during the movement.
The Reverse Barbell Lunge for Different Athletes
The reverse barbell lunge can be used in a variety of ways, depending on your chosen goals.
The barbell reverse lunge for Bodybuilders, Strength Athletes, Powerlifters, Olympic Weightlifters and Functional Fitness Athletes
Use the reverse lunge as a unilateral leg exercise to assist in the development of the quadriceps, hamstrings, and glutes.
This movement is an effective tool to address movement imbalances (such as hip shifting in the bottom of the squat) and muscle asymmetries. Team it as an accessory exercise with squats (front or back) to further build incredible lower body strength and muscle.
The Reverse Barbell Lunge for Endurance Athletes
This exercise can be good for developing unilateral stamina and muscle endurance when performed with higher volume sets and restricted rest periods. Runners, cyclists and other endurance athletes should train and make use of lower body unilateral exercises as this is highly sport specific and will provide significant advantages.
Outdoor Fitness, General Health and Wellness
For outdoor and full body fitness, including general wellness, the reverse barbell lunge is a great way to maintain mobility and flexibility, increase lower body strength, muscle development, and improve stability in the knee and hip.
The reverse barbell lunge will stress your body in the right way and keep you strong. It helps to build strong legs, core and back, which in turn will reduce the risk of spinal injury or back pain. For activities that involve a heavy lower body influence (such as trekking or hill walking) this exercise will significantly improve your fitness in the relevant ways.
Squats and deadlifts are hugely important and effective exercises, but some people may need to take time to develop their mobility and flexibility in order to perform them properly. The reverse barbell lunge is a handy tool to help work on these areas, or act as an effective substitute if the need requires.
SINGLE ARM KETTLEBELL OVERHEAD LUNGE
Benefits of Single Arm Kettlebell Overhead Lunge
The single arm kettlebell overhead lunge will strengthen and improve the entire core and back, shoulder stabilisers, hips, glutes hamstrings and grip.
The movement will develop the ability to fire and fully activate your glutes and hamstrings on the working leg. The single arm overhead position is a great test for your core stabilisers and strength. It will also cruelly punish and identify weaknesses in your overhead, shoulder, hip and upper back (thoracic) mobility.
Many unilateral exercises (such as the pistol squat) are quad dominant. Without enough variety in the single leg drills that you employ, you may miss some of the core and hip strengthening benefits that an exercise such as the single arm kettlebell overhead lunge will provide.
How to do the Single Arm Kettlebell Overhead Lunge
- Place your feet shoulder width apart with the knees slightly bent.
- Press the single kettlebell overhead with your right arm until your arm is fully extended. Keep the weight directly overhead (in line with the shoulder joint)
- Inhale and brace the core, glutes, shoulders and grip. Maintain a neutral head position
- Plant your forward heel into the ground and begin to lower your left knee directly under your hips. Keep your chest up, don’t let it cave forwards
- Descend until your left knee touches the floor. In this bottom lunge position, your back leg should be as close to a right angle as possible
- Keeping your core braced, explode upwards and return to the starting position with both legs and hips fully extended
- Alternate legs and repeat
Training Tips for the Single Arm Kettlebell Overhead Lunge
With your movement, maintain a straight, vertical line from the kettlebell all the way down to your hip. That imaginary line should be the only direction that your body travels, straight up and down across the sagittal plane of motion.
Don’t bend your elbows or allow the kettlebell to fall during the exercise
Don’t let your front heel rise from the ground at any point during the exercise
A good way to manoeuvre the kettlebell into the starting position is to first rack it with both hands, then press it into the stable overhead position.
As you drop your back knee down to the ground during the descent, make sure there is no rotation in the knees, hips, or shoulders.
Do not lean to one side or the other at any point during the single arm kettlebell overhead lunge, keep your core tight and shoulders packed.
DUMBBELL BOX STEP OVERS
Benefits of Dumbbell Box Step Overs
Dumbbell box step overs are an excellent exercise to build muscular endurance, full body conditioning, grip, leg and core strength and mental toughness. They focus on the quads, hamstrings, core, calves, hip flexors, grip and back strength. Because they are a unilateral exercise there is also a strong focus of balance and coordination balance.
Often found in functional fitness workouts, this exercise is categorised as low skill grunt work. This means that you can really push your limits and test yourself under fatigued conditions with a much lower risk of injury.
You can choose to load the movement up with heavy weights and treat it as a type of weighted carry, in order to build strength and muscle. Or select lighter dumbbells and utilise it as a conditioning tool for longer workouts.
Dumbbell box step overs also move the body through all three planes of motion (sagittal, frontal and transverse) so are an excellent way to improve full body strength and mobility. They will help you will box jumps, the assault bike, sled pushes and sled drags and even deadlifts and other posterior chain focused exercises
How to do Dumbbell Box Step Overs
- Inhale and brace your core and glutes. Grip the dumbbells tightly, draw your shoulders back, and squeeze (engage) your lats
- Take a large step with your right foot onto the top of the box
- Shift your weight onto the right foot on the box. Keep your chest up, arms straight, and shoulders back
- Straighten your right leg and bring your left foot up until you are standing on top of the box with both feet
- Re-engage your core and Step down with your right leg first, followed by the left
- Once you have descended from the box, turn around so you’re facing the box. That’s one rep
- Repeat the movement, this next time stepping up first with your left leg.
Training Tips for Dumbbell Box Step Overs
You can turn on top of the box in order to move the body through all three planes of motion (Sagittal, frontal and transverse). This can also make the movement faster if you are performing a prescribed number of reps in a CrossFit® or functional fitness workout.
Keep a neutral head position. It can be easy to look downwards at your feet whilst stepping up and down but this can cause the shoulders to round forward and the chest to cave. Try to keep your head up and your chest proud as much as possible.
DEDLIFTING LEG EXERCISES
DEADLIFT
This exercise is a fundamental, full body multi-joint training exercise designed to build absolute strength. If you are serious about developing real posterior chain and full body strength then you must include the deadlift in your training.
Benefits of the Deadlift
With the exception of the back squat, the deadlift is almost unrivalled as an exercise when it comes to packing on full body strength and muscle. Deadlifts engage all the major groups of muscles of the body. Not only do deadlifts work the legs, posterior chain and entire lower body, they also develop the biceps, forearms, traps, grip, core, lats and upper body.
Deadlifts burn fat, strengthen the central nervous system, increase bone density, improve posture, increase testosterone levels, strengthen joints and ligaments, reduce the speed of the aging process and counter depression and anxiety.
How to Deadlift
- Stand with your mid-foot under the bar. Your shins shouldn’t touch it yet.
- Keep your feet slightly narrower than shoulder width apart. The stance should be narrower than your foot positioning for squats. Point your toes out 15 degrees.
Reach down and grip the barbell with both hands. Don’t bend your legs. Keep the distance between your hands fairly narrow, about shoulder-width apart in a similar fashion to the Overhead Press. Your arms should be completely straight - Drop into position by bending your knees until your shins touch the bar. If the bar moves away from your mid-foot then reset the entire set up
Straighten your back by raising your chest. Do not change your position - Inhale, brace your core, glutes and grip. Push your feet against the ground as hard as you can and pull the barbell upwards off the ground. Keep the bar in contact with your shins and legs while you pull
- Fully open and extend your hips at the top of the movement. Don’t shrug or lean back. Lock your hips and knees
- Hold the weight for a second at the top then descend. Return the weight to the floor by moving your hips backwards whilst bending your knees
- Pause at the bottom. Repeat
Training Tips for the Deadlift
Keep your thumbs around bar with both palms facing you (pronated grip)
Never bend your elbows. Lock them both before and during the entire range of motion of the pull.
Keep your chest up and proud in order to avoid rounding of the back. Maintain a neutral head position and a straight spine. Don’t hyperextend the back or let it round.
Don’t squeeze your shoulder blades throughout the exercise
Don’t jerk the bar off the floor. Pull first to take all the slack out of the barbell then pull the barbell upwards. Keep the barbell in contact with your shins and legs at all times.
Don’t bounce the weight between reps. Rest a second between each lift.
Don’t let your knees cave inwards. Push them to the sides on the way up then lock them out at the top.
LEG EXERCISES – ROMANIAN DEADLIFT
Benefits of the Romanian Deadlift
The Romanian deadlift is an excellent exercise to build a strong posterior chain and powerful hamstrings. It reinforces and strengthens hip hinge mechanics and works the glutes, erector spinae (lower back), middle and upper back, trapezius, forearms, core and grip.
The movement is relatively unique because it prioritizes a controlled negative (or eccentric) contraction (through the lowering of the weight). This is different from most leg exercises that focus primarily on the lifting portion of the weight, without putting as much emphasis on the descent.
How to do Romanian Deadlifts
- Stand with your feet shoulder width apart. Toes outwards slightly. When you look downwards the barbell should be in line with your midfoot.
- Bend down and grip the barbell with a slightly wider than shoulder width grip. Bend your knees slightly but not completely
- Keep your back flat and ensure your shoulders are over the barbell.
- Inhale, brace the core, glutes and grip. Keep your back straight and maintain a neutral head position
- Push the hips back and maintain a strong back. You will feel tension develop in the hamstrings and across the back (lower and middle, especially around the shoulder blades), with the torso moving towards being parallel to the floor.
- Use glutes and hamstrings to stand upwards. Keep the barbell close to the body.
- At the top of the movement, contract the upper back, core, and glutes by flexing from the middle of the back to the buttocks (glutes)
- Lower barbell the same way whilst maintaining full control at all times
- Repeat
Training Tips for Romanian Deadlifts
If you’re having trouble keeping the barbell close to your body when you lift, concentrate on engaging and tensing your lats, but don’t shrug the shoulders.
Fully extend at the top but don’t hyperextend and lean too far back.
Tempo reps are a great way to force you to concentrate on the descent portion of the Romanian deadlift. Lower the weight slowly whilst counting to three. This will also increase hypertrophy (muscle growth) as it maximises time under tension.
LEG EXERCISES – SUMO DEADLIFT
Benefits of the Sumo Deadlift
Sumo deadlifts work the quads, erector spinae and lower back, traps and upper back, glutes, hamstrings, core and grip strength. Sumo Deadlifts are a great leg exercise that will also increase your pulling strength in a way that decreases lumbar stress and pressure.
The Sumo deadlifts target the quads more than the conventional or Romanian deadlift because the leg placement and set up requires the knees to bend more (increased flexion).
Lower back strength is often a limiting factor for athletes performing the conventional deadlift, as heavier maximal loads can cause the back to round and the lift to fail. The sumo deadlift allows lifters to maintain a more vertical torso in the set up and pull and develops the lower back muscles (spinal erectors).
The glutes are targeted to a high degree by the sumo deadlift, primarily due to the foot/hip placement in the setup. The sumo deadlift places the hip in external rotation, which in turn involves the glutes to a higher degree, making this a great exercise to target the glutes.
How to do Sumo Deadlifts
- Assume a wide stance with the toes pointed out
- Extend the arms downwards inside the knees. Keep the elbows inside the knees
- Place the shoulders over the bar, maintain a neutral, flat spine and keep your shins perpendicular to the floor.
- Grip the bar with a double overhand grip (pronated)
- Inhale and brace the core, glutes and grip
- Set the tension. Pulling the the barbell up slightly without lifting it off the floor. Take all the tension and flex out of the barbell.
- Keep the chest up, the barbell close to the body, and pull
- Lift to a fully extended position
- Lower and repeat
Training Tips for the Sumo Deadlift
To create as much lifting force as possible, think about simultaneously driving through the feet through the ground and pulling the bar upwards.
Do not allow the chest to fall or the hips to rise in the pull. Keep the barbell as close as possible to the body as you stand up.
SINGLE LEG DEADLIFT
Benefits of Single Leg Deadlifts
Single leg deadlifts build back, glute and leg strength and size. They enhance grip strength, coordination, balance and target each glute individually to strengthen both sides equally.
Single leg deadlifts teach and enforce the hip hinge movement pattern for deadlifts. They are an effective unilateral tool to use to uncover personal weaknesses in strength, mobility and flexibility.
- Deadlift the loaded barbell or dumbbells into the starting, fully extended position. If you are starting with a bodyweight single leg deadlift then ignore this first step
- Stand with your feet slightly narrower than shoulder width apart. Point toes out slightly
- Plant the right foot and press hard into the ground. Shift the centre of gravity over the right foot
- Lift the unloaded left leg back behind you until it is no longer touching the ground. Keep this leg straight throughout the full range of motion
- Inhale and brace your core, glutes and grip
- Slowly hinge at the hips. Maintain a flat, neutral back with squared hips and shoulders
- After reaching the bottom position, pause for a second and focus on staying well balanced. Press hard into the ground, fully extend the hips and return to the starting position
- Pause at the top of each repetition in a single leg “standing plank”
- Repeat
How to do Single Leg Deadlifts
Training Tips for the Single Leg Deadlift
If you find it difficult to balance your body throughout the full range of motion then practice by holding on to a stable object.
Practice this movement as a bodyweight exercise first in order to familiarise your body with the entire range of motion and stresses.
If you want to challenge your hamstrings, glutes, and quads even more, increase the bend of the working side knee. This will create a deeper hinge and make the overall movement more difficult.
Make sure you maintain the lat-shoulder connection. You need to control the weight at all times, not the other way around.
Common Mistakes for The Single Leg Deadlift
Don’t bend the back leg. The raised leg must be kept straight and tensed. Relaxing the raised leg can loosen the tension in the core and cause the upper (thoracic) or lower (lumbar) spine to round.
Don’t open or twist the hips. Keep your shoulders and hips square and resist the natural tendency to open the body as this will decrease the tension and efficiency of this skill.
Don’t lose the lat activation. Keep your lats activated throughout the entire exercise. Try the following if you find that this is happening to you: place a foam roller between the toes of the non-working leg and your palm, then perform the movement without losing the foam roller.
DEFICIT DUMBBELL DEADLIFT
This exercise can be performed with both kettlebells or dumbbells.
Benefits of Deficit Dumbbell Deadlifts
Deficit dumbbell deadlifts increase the joint flexion of the ankles, knees, and hips due to the increased range of motion. They increase a lifter’s usage of the legs and hips in the movement, leading to improved leg strength and drive. They develop the hamstrings, glutes, core, grip, posterior chain and lower back (lumbar).
The exercise is a great way to prep and develop the body for strong and safe pulls.
As a movement, deficit dumbbell deadlifts increase knee flexion, which in turn raises the involvement of the quads during the early pull phase of the deadlift in general. By increasing the range of motion, the lifter is forced to develop maximal tension and strength at the end ranges which will help develop posterior chain and lower/middle back strength. The extended range of motion also raises the amount of time under tension, leading to better results for hypertrophy.
Practicing this section of the deadlift movement can help you break through strength plateaus and sticking points will stress your body in new ways, building specific strength and power by adding a new kind of variety and intensity into your training.
How to do Deficit Dumbbell Deadlifts
- Step up onto a 20kg weights plate
- Break at the hips and knees. Extend your arms vertically downwards and grip the dumbbells
- Set your hips and adjust them for the raised position
- Inhale and brace your core, glutes and grip. Engage your lats
- With your feet, push the floor away as you rise. This will activate the quads to extend the knee first, without having your hips rise faster than the dumbbells
- Maintains a neutral, straight spine. Don’t round the back or let it overextend
- To initiate full extension at the top of the movement, aim to lock the hips and knees at the same time. Don’t bend back at the top
Training Tips for the Dumbbell Deficit Deadlift
In the dumbbell deficit deadlift you will need to start with your hips slightly lower than where you would normally place them for a standard deadlift.
LEG EXERCISES – GLUTE HAM RAISES
Benefits of Glute Ham Raises
Glute ham raises develop and enhance the glutes, hamstrings, spinal erectors, gluteals, rhomboids (when back loaded) calves (isometric) and entire posterior chain. They strengthen the hamstrings at the knee and the hip by working its two primary functions, knee flexion and hip extension at the same time.
For muscle growth (hypertrophy) glute ham raises are better that leg curls because they work more muscles. They also work well to help prevent ACL injuries and hamstring strains.
If you want to improve sprinting, power and jumping then glute ham raises are an effective tool. They will also help to enhance your squat, deadlift and pretty much every other lower body exercise.
How to do Glute Ham Raises
You will need a glute ham developer (GHD) machine
- Adjust the glute ham developer so that when your feet are fastened, your quads will rest on the middle of the pad and you can easily lower your torso over the end of the machine
- Begin the movement with your knees bent at 90 degrees. Your body will be straight and perpendicular to your lower legs
- Fold your arms across your chest
- Inhale and brace your core
- Slowly lower your torso forwards over the edge of the GHD until your body is in a horizontal position
- Pause, then return to the starting position by contracting your hamstrings
Training Tips for Glute Ham Raises
Take your time if you have never attempted this exercise before. It requires a degree of getting used to but is highly effective once you have grown confident.
For additional stimulus, try front loading the exercise by gripping a weight plate.
PUSHING AND PRESSING LEG EXERCISES
SLED PUSHES
Benefits of Sled Pushes
The sled push is a highly effective strength conditioning exercise that targets and develops the cardiovascular system, hips, glutes, quads, calves, core and mental toughness. It increases leg drive, explosive power and single leg strength with a low risk of injury. Additionally, because there is no eccentric portion to the exercise there is generally less muscle pain and DOMS (delayed onset muscle soreness).
Training wise sled pushes are highly versatile. Load the sled up with heavy weights to target pure strength under fatigued conditions or make it lighter and test your aerobic capacity with no risk of technical failure.
The sled push can be used as part of a dynamic warm-up, a great way to develop power in its own right, a finisher or as part of a functional fitness conditioning workout.
Leg Exercises – How to do Sled Pushes
- Grip the sled
- Adopt the same stance as your natural running position
- Inhale and brace your core, glutes, back and grip
- Maintain a neutral spinal position
- Face forwards with your torso and pelvis
- Ensure that your knees are in line with your feet
- Explode forward
- Training Tips for Sled Pushes
- Depending on your type of equipment, you may be pushing handles or straps in front of the sled. Adjust your grip accordingly.
- Maintain a tight core at all times. This will help you transfer power effectively from your legs into forward momentum.
- Use smaller steps to get the sled moving first. Once you have momentum it will be easier to drive the sled forwards.
Try these Sled Push Workouts if you want to test yourself with this leg exercise and enhance your physical and mental strength.
LEG EXERCISES – SLED PULLS
Benefits of Sled Pulls
Sled pulls are a highly effective full body exercise that target the quads, glutes, hamstrings, calves, core, traps, back, shoulders, biceps, forearms and grip.
They can be easily programmed in various ways, building both aerobic and anaerobic capacity, power, strength, muscle and mental fortitude. Nearly everyone can perform sled pulls, regardless of ability level and athletic background.
Sled pulls present many of the same benefits as sled pushes, combining a low risk of injury with less DOMS. Sled pulls are often used as an efficient movement for active recovery as they increase blood flow to muscle tissues, clear metabolites, and increase GPP (general physical preparation).
How to do Sled Pulls
- Secure the weight plates onto the sled. Hold the other end of the stretched rope
- With your back facing the sled, grip the bands/rope tightly
- Adopt a low sprinting stance
- Inhale and brace your core, glutes and grip
- Take any excess slack out of the rope
- Press hard against the floor with your feet to generate power
- Explode forward and pull the sled
Leg Exercises – Training Tips for Sled Pulls
If you don’t have a weighted sled you can try making your own using a large tire or pallet.
Establish and hold a tight core at all times. This will enable you to transfer power effectively from your legs and pull the sled forward.
Use smaller steps to get the sled moving first. Once you have momentum it will be easier to pull the sled where you want it to go.
LEG EXERCISES – LEG PRESSES
Benefits of Leg Presses
Leg presses are a great isolation exercise that primarily target the quadriceps. The seated position takes away the load on the spine that a back squat offers. They are an effective accessory exercise, popular with bodybuilders and can be a great tool for higher rep sets to failure or as finishers at the end of leg workouts.
How to do Leg Presses
- Sit on the machine with your back and head resting comfortably against the padded support
- Place your feet on the footplate about hip-width apart. Ensure your heels are flat
- Form an angle of 90 degrees at the knees
- Grip the handles and establish a feeling of full stability and control
- Inhale, tense your core, glutes and grip. Push the platform away with your forefoot and heels
- Pause at the top of the movement. Do not lock out the knees. Keep bracing the force of the weight
- Exhale and return to starting position
- Repeat
Training Tips for Leg Presses
Don’t raise your glutes, keep them flat against the seat.
Never let your knees cave inwards.
If you are new to leg presses then start slowly. You will advance and build strength and muscle gradually over time. Get the feel of the movement first and progress from there.
Make sure to move the weight through the full range of motion in order to maximise results. Don’t do half reps.
Never use only the front of your foot or toes to move the weight.
Foot Placement
- High Feet – Activate and target the hamstrings and glutes. This position takes stress away from the quads
- Low Feet – Work the quads and the deepest quad muscles (vastus intermedius)
- Wide Feet – Target the inner quad muscles (vastus medialis)
- Narrow Feet – Strengthen the outer thigh muscles (vastus lateralis)
LEG EXTENSIONS
Benefits of Leg Extensions
Leg extensions target and strengthen the quad muscles that are located on the front of the thigh (rectus femoris and the vastus muscles). Leg extensions are a great finisher or accessory exercise and they are an effective exercise to isolate and focus on the quads if muscle growth (hypertrophy) is your goal.
Leg Exercises – How to do Leg Extensions
- Sit on the leg extension machine with the pad resting against your shins
- Adjust so that the knees are at a 90 degree angle
- Grip the handles tightly
- Inhale and tense your core, glutes and grip
- Lift the weight until your legs are almost straight. Do not lock your knees. Keep your back flush against the backrest and do not over arch (hyperextend) your back
- Exhale and lower the weight back to starting position
- Focus on the mind muscle connection, feel your quads contract and relax
- Repeat
Training Tips for Leg Extensions
Don’t try to hit a 1 rep max. Use this exercise for what it’s good at, isolating and targeting the quads and hypertrophy. Due to the risk of knee ligament strain, do not use this exercise for low-rep, high-load strength conditioning.
Concentrate on tempo. Don’t use momentum to power each rep as this will make the movement easier and therefore less effective. Vary the rep tempo.
Try a three second decline to maximise time under tension.
Do not lock the knees at full extension at the top of the movement. This can strain the knee joint.
LEG EXERCISES
When training with these leg exercises, always think about what goals you are trying to achieve and train accordingly.
If you are unsure where to start, begin with the back squat. The correctly performing, full range of motion is one of the best leg exercises ever, and should be a part of everyone’s training, regardless of age, gender, weight or experience. As Mark Rippetoe explains so eloquently:
“There is simply no other exercise, and certainly no machine, that produces the level of central nervous system activity, improved balance and coordination, skeletal loading and bone density enhancement, muscular stimulation and growth, connective tissue stress and strength, psychological demand and toughness, and overall systemic conditioning than the correctly performed full squat.”
Strong legs will improve your full body strength, protect you from injury, build better power and endurance for walking, running and life in general. As the old saying goes, never skip leg day!
If you want to improve your strength and muscle in other parts of your body and fitness, check out these Chest, Abs, Bicep, Tricep, Shoulder and Back Exercises.
Comments are closed.