Best Tricep Exercises for Muscle Mass and Strength
These tricep exercises are designed to help you build stronger and more functional arms.
More effective triceps will help your general arm and upper body strength, improve your ability to lockout overhead movements and transfer well to outdoor fitness activities such as climbing and kayaking.
When it comes to bodybuilding and aesthetics, the triceps make up around 60% of your upper arm.
Many lifters looking to build mass and muscle make the mistake of not working evenly on the triceps and biceps by emphasing the former over the latter.
As they work together to move and control movement of the arms, they should be trained proportionately with your selection of the following Tricep Exercises.
- Tricep Muscles
- 1. CLOSE GRIP BENCH PRESS
- 2. TRICEP EXERCISES – EZ BAR SKULLCRUSHER
- 3. HALF BENCH DUMBBELL SKULLCRUSHER
- 4. TRICEPS KICKBACK
- 5. STANDING DUMBBELL TRICEP EXTENSIONS
- 6. LYING DUMBBELL TRICEP EXTENSIONS
- 7. KETTLEBELL FLOOR PRESS
- 8. CLOSE GRIP PUSH UP
- 9. TRICEP EXERCISES – PARALLEL BAR TRICEP DIPS
- 10. BENCH TRICEP DIPS
- 11. TRICEP EXERCISES – OFF-SET KETTLEBELL PLYOMETRIC PUSH UPS
- 12. CABLE OVERHEAD EXTENSION WITH ROPE
- 13. CABLE TRICEP PULL DOWN
- 14. TRICEP EXERCISES – KNEELING TRICEP PRESSDOWNS
- 15. PLANK HOLD TRICEP FINISHER
- TRICEP EXERCISES
Tricep Muscles
The triceps branchii run along the humerus (the main bone of the upper arm) between the shoulder and the elbow and enables extension and retraction of the forearm. They consist of three muscles, the lateral head, long head and medial head.
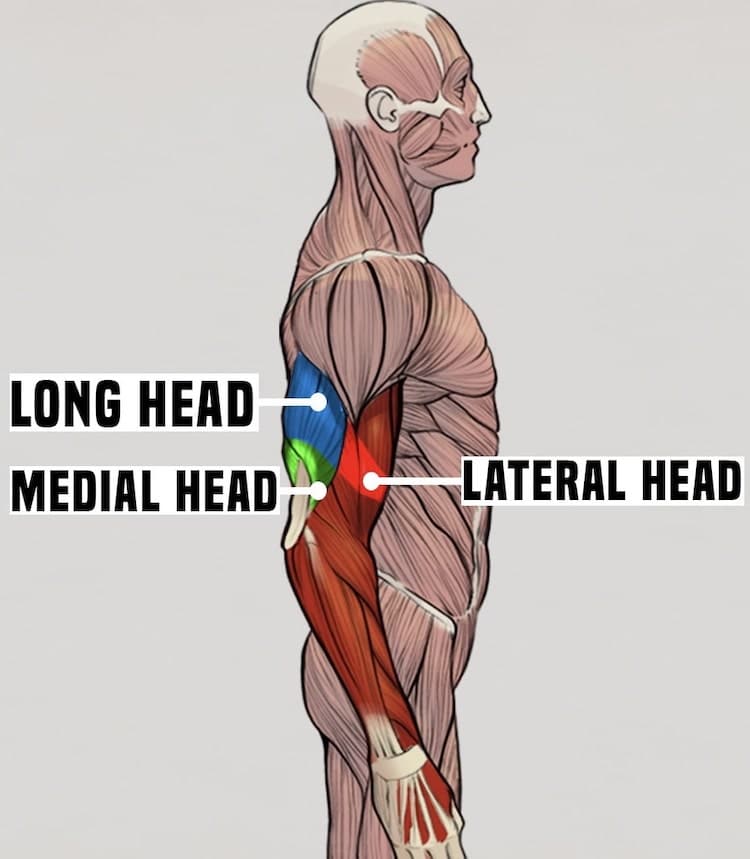
When the triceps are contracted, the forearm extends and the elbow straightens; if the triceps are relaxed and the biceps flexed, the forearm retracts and the elbow bends.
The triceps exercises in this article are divided into three categories so that you can choose the movements that are most suited to your personal goals and form of training.

Barbell and Dumbbell Tricep Exercises
- Close Grip Bench Press
- EZ Bar Skullcrusher
- Half Bench Dumbbell Skullcrusher
- Triceps Kickback
- Standing Dumbbell Tricep Extensions
- Lying Dumbbell Tricep Extensions
- Kettlebell Floor Press
Bodyweight Tricep Exercises
- Close Grip Push Up
- Parallel bar Tricep Dips
- Bench Tricep Dips
- Off-Set Kettlebell Plyometric Push Up
Cable and Rope Tricep Exercises
- Cable Overhead Tricep Extension with Rope
- Cable Tricep Pull Down
- Kneeling Tricep Pressdowns with Bands
- Plank Hold Tricep Finisher
1. CLOSE GRIP BENCH PRESS
Benefits of the Close Grip Bench Press
An excellent compound tricep exercise, the Close Grip Bench Press can be used to build strength and / or build muscle. The movement puts less strain on your elbows, allowing you to lift more weight than you could with an isolation exercise.
It targets the triceps without isolating them but also trains the forearms, grip, pectorals, lats, deltoids and core as well, forcing your entire upper body to work together.
How to Do the Close Grip Bench Press
- Lie back on the bench and grip the barbell with your hands inside shoulder width. Use an overhand grip (pronated).
- Create a strong base by planting your feet firmly on the floor and glutes and upper back and shoulders in contact with the bench
- Inhale deep into your belly and brace your core, grip and glutes
- Lower the barbell. Guide your elbows inwards towards the body. This will allow the triceps to control most of the eccentric loading (and therefore produce maximum gains)
- Lower the weight until the barbell comes into contact with the lower chest (sternum bone)
- Explosively press the barbell upwards using the triceps and chest muscles. Keep the glutes, legs, shoulders and back tight in order to maintain a strong base with your body
- Repeat
Training Tips for the Close Grip Bench Press
When you set up for the Close Grip Bench Press, think about first gripping the floor with your feet then grabbing the bench with your buttocks and upper back. This will force you to create a strong base with your body that will give you a stronger pressing movement.
Don’t allow your shoulders to shift forwards away from the bench. Keep them down and back (retracted) throughout the full range of motion.
Keep your elbows tight into the sides of your body at all times.
2. TRICEP EXERCISES – EZ BAR SKULLCRUSHER
Benefits of the EZ Bar Skullcrusher
The EZ Bar Skullcrusher is an effective way to target the long head of the tricep. It is much less stressful on the wrists and can be effective even with relatively light weights.
How to do the EZ Bar Skullcrusher
- Grip the EZ bar with an overhand (pronated) grip and sit on the edge of a flat bench
- Lay back onto the bench with the bar against your chest. Press your feet into the floor to establish a stable position
- Press the weight upwards into a standard bench press position
- Inhale and breath deep into your core. Tense your abs, grip and glutes
- Lower the weights towards your head by unlocking the elbows and allowing the EZ bar to drop toward your forehead (or the space above your head)
- Once your forearms reach parallel (or slightly below), exhale and reverse the movement by extending the elbows while flexing the triceps to lockout the weight
- Repeat for desired number of repetitions
Training Tips for the EZ Bar Skullcrusher
Maintain tension in the core at all times. Make sure you don’t overextend (hyperextend) the lumbar spine.
If this movement causes you any shoulder or elbow pain, change the angle of the bench slightly (incline or decline) or adjust the position of your elbows until the entire movement feels more natural.
3. HALF BENCH DUMBBELL SKULLCRUSHER
Benefits of the Half Bench Skullcrusher
This variation exercise brings the core much more into play. You will perform the movement with half of your body off the bench, unsupported. This combination forces you to stabilise your entire body whilst controlling the dumbbell through the entire range of motion.
This will also help to establish a stronger mind muscle connection.
How to do the Half Bench Skullcrusher
- Lie on a bench holding a dumbbell in your right hand. Press the weight upwards and fully extend your arm. Position the weight directly above your shoulder
- Slide your body over to the right so that your right glute, shoulder blade, half of the back and half your head are all off the bench and completely unsupported.
- Inhale and tighten your core, glutes and grip
- Bend at the elbow, lowering the dumbbell toward your forehead. Exhale and press the weight back up to the starting position
Training tips for the Half Bench Skullcrusher
Breathing is exceptionally important. Use your breathing to help you establish a solid foundation from which to life from.
Plant your feet into the ground and imagine gripping the floor with your toes. This will help to increase stability.
4. TRICEPS KICKBACK
Benefits of the Triceps Kickback
As Tricep Exercises go, triceps kickbacks are a good way to isolate the tricep and serve well as a tricep accessory exercise during a workout. They help to establish a good mind muscle connection and are a simple and effective way to build arm strength and control.
They also have the advantage of being easy to perform. You simply need to grab a pair of dumbbells and you’re ready to go.
How to do the Triceps Kickback
- Start in a standing position holding a dumbbell in either hand with your palms facing your body (a neutral position)
- Inhale deep into your lungs and tighten your grip, core and glutes
- Maintain a straight spinal position. Bend forward at the waist. Bring your torso almost parallel to the floor
- Pin your elbows in to your sides.
- Now straighten your arms, lifting your forearms upwards in the process. Engage your triceps. Exhale towards the top of this movement.
- Hold the weight at the fully extended position for a one second count and squeeze your triceps as tight as you can.
- Slowly lower the weight to the starting position
- Repeat
Training Tips for the Triceps Kickback
Keep the weight light and focus on perfect form. You are not trying to find a new one rep max with this movement.
Don’t move your upper arm. Keep your elbow fixed in the same place and lift the weight like a lever.
Concentrate your thoughts on the triceps muscles as you lift the weight. Feel them activating and working. This will help to build a better mind muscle connection.
5. STANDING DUMBBELL TRICEP EXTENSIONS
Benefits of Standing Dumbbell Tricep Extensions
Standing Dumbbell Tricep Extensions are another useful exercise to isolate the triceps. The long head of the tricep aids more in elbow extension at shoulder elevation, but once at 90 degrees or above shoulder elevation, the medial head takes over. This exercise allows you to target both.
It is also a great finisher to achieve a final pump and work your triceps to exhaustion at the end of a workout.
How to do Standing Dumbbell Tricep Extensions
- Stand up with the dumbbells held by your sides. Keep your feet shoulder width apart
- Draw a deep breath into your lungs and brace your core, glutes and grip
- Lift the dumbbells above your head until your arms are in fully extended position
- Pin your elbows into the same position above your head then slowly lower the dumbbells back down behind you head
- Once your forearms move beyond parallel to the floor bring the weight back up to the starting position. Exhale during this part of the tricep exercise
- Repeat
Training Tips for Standing Dumbbell Tricep Extensions
Be being careful not to flare your elbows out too much during the entire range of motion as this can lead to unwanted pressure and stress on the joints.
Make sure to use a weight that you can comfortably control at all time. You aren’t trying to hit a new one rep max.
6. LYING DUMBBELL TRICEP EXTENSIONS
Benefits of Lying Dumbbell Tricep Extensions
Lying Dumbbell Tricep Extensions are a versatile and effective exercise to help you grow muscle and strength for your arms and stabilise your shoulder joint. You can adapt this tricep exercise by working with both arms (bilaterally) or a single arm (unilaterally) at a time. This allows you to hone in on weaknesses in your movement and strength, as we all often have weaker sides or limbs.
Lifting unilaterally allows you to place all your focus on each arm at a time and it will clearly reveal which one is stronger. These tricep exercises can also function as a handy finisher or accessory exercise for any workout.
How to do Lying Dumbbell Tricep Extensions
The steps below are specific for single arm Lying Dumbbell Tricep Extensions but are also applicable for the variation with two dumbbells. Simply follow the same steps with both arms performing the exact same movements.
- Grip the dumbbell (one or two depending if you are performing the exercise with one arm or both) and lie back against the bench
- Plant your feet firmly into the ground
- Press the dumbbell upwards directly in front of you. Fully extend your arm. Your palm should face inwards (neutral) and the elbow should be tucked in. The arm with the dumbbell should be positioned at a 90-degree angle to the floor. This is the starting position
- Inhale and brace your core, glutes and grip
- Bend your elbow and slowly bring your arm and dumbbell downwards towards your shoulder
- At the bottom, squeeze your triceps as tight as possible and hold for a count of one second
- Exhale as you bring the arm and dumbbell back to the starting position
- Repeat
Training Tips for Lying Dumbbell Tricep Extensions
Use your feet to create a solid foundation for the movement. A strong base will enable you to concentrate completely on the movement of your arm. Maintaining a tight core at all times is also key to this as well.
Use proper form at all times and build up the weight gradually.
7. KETTLEBELL FLOOR PRESS
Benefits of the Kettlebell Floor Press
The Kettlebell Floor Press is a variation of the classic bench press. It focuses on the lockout portion of the movement, will strengthen your triceps and act as an excellent accessory exercise to push your bench press numbers up as well.
How to do the Kettlebell Floor Press
- Sit on the floor with two kettlebells positioned just outside the hip on both sides of the body.
- Grip the kettlebells and lift them onto the thighs. Now lie back until your body is completely flat against the floor.
- Rack the kettlebells into the bench press position with your triceps resting flat against the ground
- Inhale and brace your core, glutes and grip
- Press the kettlebells upwards (as you would in a standard dumbbell bench press). Move your arms slightly inwards as you move towards the top of the range of motion
- Squeeze your triceps tight at the top of the movement
- Gently lower the kettlebells to the starting position. Exhale during this part of the lift.
- Repeat
Training Tips for the Kettlebell Floor Press
Don’t bounce the weights at the bottom of the movement. Move slowly with control and purpose. This will maximise time under tension (and therefore muscle growth – hypertrophy) and strength gains, as well as limiting the potential for injury.
Keep wrists in a neutral position at all times.
Maintain contact with your hips against the floor at all times.
Avoid smashing the kettlebells together at the top of the movement. This will take the stress away from the muscles and limit your results.
8. CLOSE GRIP PUSH UP
Benefits of the Close Grip Push Up
The Close Grip Push Up is a highly effective bodyweight exercise that will torch and improve your triceps, arms and entire upper body.
With this movement you use your body as the load and activating the triceps in a functional and significant way. This triceps exercise will develop strength and build muscle.
Another great advantage of this exercise is that you can perform it anywhere that you have a floor.
How to do Close Grip Push Ups
- Start in a standard push up position
- Now move your hands inwards slightly until they are narrower than shoulder width apart. If you move them even closer so the fingers and thumbs on each hand touch each other, then this is called a Diamond Push Up
- Inhale and brace your core and glutes
- Lower your body towards the floor all the way until your chest touches your hands
- Push your body back to the starting position. Exhale as you move upwards
- Repeat
Training Tips for Close Grip Push Ups
Make sure that your elbows don’t flare out to the sides. Keep them locked in place.
The closer you put your hands together, the harder this exercise will be. You can also scale the movement by not going all the way to the floor with your chest.
Another good way to add variety to this movement is to try it with a kettlebell. Rest a heavy kettlebell securely on its side and place both hands on it. Perform the exercise in the same way mentioned above. This will change the stimulus of the movement and keep your body guessing.
9. TRICEP EXERCISES – PARALLEL BAR TRICEP DIPS
Benefits of Parallel bar Tricep Dips
Tricep Dips are another excellent type of bodyweight Tricep Exercises to build powerful arms and a strong upper body. The focus is placed on the triceps but the exercise also stretches and strengthens the chest and shoulders depending on the position of the body.
Keep your torso upright to target the triceps and bend your body forward to change the stimulus towards your chest.
Dips can be performed for low reps for strength or higher reps for muscle growth (hypertrophy). Additionally, it is easy to add weight with a belt so that the intensity of the movement can be increased.
How to do Parallel bar Tricep Dips
- Grip the parallel bars with both hands, jump up and straighten your arms
- Find a solid point of balance
- Inhale, brace your core and glutes and squeeze your grip on the parallel bars as tightly as possible
- Lower your body by bending your arms. Maintain complete control at all times
- Dip down until your shoulders are below your elbows. Squeeze your triceps as hard as you can
- Lift your body up by straightening your arms. Exhale during this part of the movement
- Lock your elbows out at the top
Training Tips for Parallel Bar Tricep Dips
Proper form for Parallel Bar Tricep Dips is highly important to make sure that you avoid shoulder and chest pain.
Don’t let your shoulders roll forward and don’t shrug them during the movement. Try to keep them pinned into position throughout the entire range of motion.
Crossing the legs makes it easier for many athletes to maintain tension in the body.
10. BENCH TRICEP DIPS
Benefits of Bench Tricep Dips
When it comes to Tricep Exercises, Bench Tricep Dips are a highly effective triceps exercise that you can perform with minimum equipment such as a bench or chair. They can be done on any raised surface, build stronger arms and are a great burnout finisher exercise to finalise workouts.
Extra weight can be easily added by placing the load such as a weights plate or other object on your lap.
How to do Bench Tricep Dips
- Sit on the edge of the bench and grip the edge with your hands.
- Keep your legs straight and plant your heels into the ground
- Inhale and brace your core, glutes and grip.
- Press your body upwards a few centimetres then slide your glutes forwards until they are completely off the bench. Keep your eyes forwards and your body tight
- Use your arms to lower your body until your arms are bent to over 90 degrees
- Push your body back upwards to the starting position. Exhale during this part of the movement
- Repeat to complete the desired number of reps
Training Tips for Bench Tricep Dips
Don’t lock your elbows out at the top. This will help to maintain tension at all times and lead to quicker and stronger strength and muscle gains. Make sure to feel tension on the triceps at all times.
Don’t shrug your shoulders. Keep your shoulders away from your ears. You shouldn’t need to tense your neck.
If you are new to Bench Tricep Dips then start slowly and feel your way slowly through the full movement. You don’t need to dip as low as possible and if you feel too much strain then shorten the range of motion. The important aim is to have the triceps do the work.
11. TRICEP EXERCISES – OFF-SET KETTLEBELL PLYOMETRIC PUSH UPS
Benefits of Off-Set Kettlebell Plyometric Push Ups
Plyometric exercises “involve a jumping movement to increase the strength and power of the muscles”.
Off-Set Kettlebell Plyometric Push Ups are a great exercise to introduce new stimuli into your training and keep your body guessing. They build explosive power, coordination, strength, proprioception (your body’s own understanding of its own movements in the surrounding space) and are a fun way to test your fitness.
Each hand works unilaterally, performing a different job, so this helps your body to improve the mind muscle connection and focus in on the triceps.
Off-Set Kettlebell Plyometric Push Ups will also work your chest, shoulders, back and core.3
How to do Off-Set Kettlebell Plyometric Push Ups
- Place a sturdy, heavy kettlebell on the floor on its side
- Rest your right hand on the side of the kettlebell and the left on the floor slightly wider than shoulder width apart.
- Your body needs to be in a standard Press Up position. Flat spine, feet together
- Inhale and brace your core, glutes and grip. Imagine your hands gripping the kettlebell and floor tight
- Lower your body in the normal Press Up manner. Observe how each arm functions differently due to the raised positioning of the arm against the kettlebell.
- Once you have reached full depth explode upwards with as much power as you can muster.
- At the top of the Off-Set Kettlebell Plyometric Push Up, as you momentarily leave contact with both hands, switch the right hand to the floor and place the left on the kettlebell.
- Repeat
Training Tips for Off-Set Kettlebell Plyometric Push Ups
Off-Set Kettlebell Plyometric Push Ups are a highly original way to target the triceps. You can alter the degree of difficulty of this triceps exercise by choosing to place your hands closer together to make it harder (and more beneficial).
If you can’t jump your body upwards and switch hands (between the floor and the kettlebell) in order to switch hands, perform the exercise without this explosive, plyometric part. Over time you will build up the necessary pre-requisite strength and be able to complete full Off-Set Kettlebell Plyometric Push Ups.
Cable and Rope Tricep Exercises
12. CABLE OVERHEAD EXTENSION WITH ROPE
Benefits of the Cable Overhead Tricep Extension with Rope
The Cable Overhead Tricep Extension with Rope is a great isolation exercise that especially targets the long head of the triceps.
The rope will force your grip to work harder and therefore get significantly stronger. Gripping the rope also enhances forearm strength and muscle recruitment.
The Cable Overhead Tricep Extension with Rope is also an effective way to build the mind muscle connection with your triceps and you can “feel” the movement and activation of the triceps exceptionally well throughout the full range of motion.
The cable helps to place stress on the triceps at all times and maximise time under tension. This is good news for your gains.
How to do the Cable Overhead Tricep Extension with Rope
- Clip a rope grip to the cable machine and fix the cable holder into the highest possible position
- Stand facing away from the cable. Reach upwards and grip the rope overhead with both hands facing each other (a neutral position).
- Still gripping the rope, move forwards into a split stance position (a less exaggerated version of the position an Olympic Weightlifter would adopt in a Split Jerk). One of your legs should be in front with the knee bent with the other behind you at a slightly straighter angle. Your body needs to lean forward slightly at the hips
- Inhale and brace your core, grip and glutes
- Pull the rope downwards and forwards from behind your head until your arms are almost locked out in front of you. Extend the elbows and flex the triceps
- Slowly return the weight to the starting position. Exhale during this part of the movement.
- Repeat
Training Tips for the Cable Overhead Tricep Extension with Rope
Try to keep your elbows fixed in a single position throughout the Cable Overhead Tricep Extension with Rope. Imagine them pinned in place when you move your arms.
If you want to keep more tension in the triceps, don’t lock the elbows out entirely.
Stay tight at all times and control the movement.
Don’t let the cable fly back and the weights crash into the stack. Both portions of the movement will stimulate muscle growth, so don’t forget to pay equal attention to them.
Don’t allow the rope to pull you backwards or cause you to overarch throughout your lumbar spine.
Ensure the shoulder blades don’t tilt forward as you extend the elbows.
13. CABLE TRICEP PULL DOWN
Benefits of the Cable Tricep Pull Down
The Cable Tricep Pull Down is a great exercise for improving lockout strength, increasing upper body mass and building bigger arms. The increased time under tension from the cable optimises muscle growth (hypertrophy) for the arms.
When the arm is fully extended, it is the triceps that are responsible for achieving the final full lock out position. For exercises such as the Bench Press, Overhead Press or Push Press, having stronger triceps will help you during the final portion of the lift when you need to reach full extension. This is also especially useful for all Olympic lifts such as the Jerk and Snatch.
As well as compounding your lock out ability for other lifts, the Cable Tricep Pull Down will also work the shoulders and chest as they are often the secondary muscle groups for pressing mass building exercises such as the Push Press, Dips and Bench Press.
How to do the Cable Tricep Pull Down
- Stand facing the cable stack with straight posture
- Grip the metal bar/rope (depending on what piece of equipment you choose to use) and pin your elbows into your sides and slightly in front of your body. Keep your torso upright and straight, don’t lean excessively forwards or backwards.
- Inhale and brace your core, grip and glutes
- Press downwards and extend the elbows so that they straighten
- At the bottom position, squeeze your triceps as hard as you can for a second before returning to the starting position. Exhale during this second part of the motion.
- Repeat
Training Tips for the Cable Tricep Pull Down
Keep your chest proud throughout the entire range of motion. Don’t let the weight tip you forwards or backwards. The idea is to fully use the triceps, not to compensate by using the back or shoulders.
Don’t let your elbows shift backwards. Keep them pinned into the same position, slightly in front of the body at all times.
You can alter your grip and the rotation and position of your hands and arms in order to stimulate your triceps in different ways during the exercise. Even shifting your arms by a few degrees will have considerable effects.
14. TRICEP EXERCISES – KNEELING TRICEP PRESSDOWNS
Benefits of Kneeling Tricep Pressdowns
This is an excellent adaptation of the Cable Tricep Pull Down. The kneeling position activates and trains your core, abs and obliques.
This is a unilateral exercise, so it will help to show and muscular imbalances you may have between your two arms (determining if one is stronger than the other for example). It will improve the mind muscle connection and coordination. Kneeling Tricep Pressdowns are also a great finisher exercise to use at the end of a workout.
The continuous pressure from the band will maximise time under tension for your triceps, perfect for muscle growth.
How to do Kneeling Tricep Pressdowns
- Attach a band to a solid object/surface above and kneel on the ground
- Keep your back neutral, upright and straight and your thighs in line with your torso.
- Grip the band with the palm of your right hand facing the body (neutral grip) in the same way as you would hold a glass of water. Activate and pull your shoulder blades backwards. Keep your left arm straight at your other side
- Inhale and brace your core, glutes and grip. Make sure your elbow is pinned in position slightly in front of your body.
- Without titling forwards and backwards, fully extend your arm and concentrate your mind on the contraction of the triceps muscles.
- When you reach full extension, squeeze your triceps as tightly as possible for a second before returning your right arm to the starting position. Exhale during this second part of the movement.
- Complete all reps with the right arm then switch the left and repeat the same process.
Training Tips for Kneeling Tricep Pressdowns with Bands
Maintain a tight core and neutral spine at all times. Control the movement with your triceps and core.
Go slow. You don’t need to rush the reps. Slowing down the movement will force you to concentrate on optimal form and increase time under tension.
The degree of difficulty of Kneeling Tricep Pressdowns can easily be changed by incremental steps by altering the type of resistance band you use, or by switching your hand position by incremental stages to give the band more or less slack as you use it.
15. PLANK HOLD TRICEP FINISHER
Benefits of the Plank Hold Tricep Finisher
If you want to add variety and novelty to your arms and upper body workouts then the Plank Hold Tricep Finisher is a great option. The stabiliser muscles of the trunk and upper body are activated in order to control the body and balance the body through the full range of motion.
As Tricep Exercises go, it is simultaneously a triceps, core and abs exercise. If you are pressed for time and want to train both of these parts of your body, then add the movement into your workout.
As the name clearly suggests, this exercise is an effective way to squeeze every last drop of energy from your triceps at the end of a session.
How to do the Plank Hold Tricep Finisher
- Attach a resistance band to an object in front of you.
- Adopt a plank position with both arms fully extended, your core and glutes tight, and your body straight
- Raise your left arm off the floor and grip the band with your left hand.
- Inhale and re-brace your core, glutes and grip
- Keeping your shoulders and hips square, pin your elbow into a single position then slowly pull the band with your left hand backwards towards your left foot
- Once your reach full extension, squeeze your triceps as had as you can for a second before returning to the starting position. Exhale during this part of the movement.
- Repeat all the reps in that set for the left arm before switching over to the right.
Training Tips for the Plank Hold Tricep Finisher
This exercise can feel unwieldy and odd at first. Start by practicing with a light resistance band and get familiar with the feel and motion of the Plank Hold Tricep Finisher.
Make sure to concentrate on maintaining optimal form with the plank. Don’t let your body slip out of position. Keep your hips and shoulders straight at all times.
TRICEP EXERCISES
These tricep exercises will all help you to strengthen your upper arms and build muscle. Depending on your goals, select the appropriate options for you.
Stronger triceps will significantly improve your arm and lock out strength for many other barbell exercises and fitness in general. If you want more mass and bigger arms, then don’t forget that your triceps make up 60% of your upper arm, so don’t neglect them.
More effective triceps will improve your strength when you rock climb or the speed and power of your stroke as you glide through the glassy morning water of a Swedish lake in your kayak.
Whatever you are aiming for, try adding these tricep exercises into your training.
Additionally, add these back, bicep, legs and shoulder exercises into your workouts.

Comments are closed.