14 Best Back Exercises to Build Strength, Muscle Mass and Prevent Injury
These back exercises will all help to build functional strength, muscle and power. A strong back will also lower the risk of spinal injury, help to improve your posture and enhance your physical preparedness for life in general.
Outdoor fitness activities such as climbing and kayaking are excellent ways to build muscular endurance and strength for your back, but making time to specifically target and build your back using intelligent programming and specific back exercises will have huge positive effects on your body and life in general.
- BACK EXERCISES
- BACK MUSCLES
- THE BACK AND THE POSTERIOR CHAIN
- BACK EXERCISES
- 1. DEADLIFT
- 2. PULL UP
- 3. BACK EXERCISES – SINGLE ARM DUMBBELL ROW
- 4. BACK EXERCISES – RENEGADE ROWS
- 5. BACK EXRCISES – BARBELL ROWS
- 6. BACK EXERCISES – RING ROWS
- Benefits of Ring Rows
- How to do Ring Rows
- 7. T BAR ROW
- Training Tips for T Bar Rows
- 8. BACK EXERCISES – LAT PULL DOWN
- 9. SEATED CABLE ROWS
- 10. BACK EXERCISES – WEIGHTED CARRIES
- Benefits of Weighted Carries
- How to do Weighted Carries
- 11. KETTLEBELL SWINGS
- 12. BACK EXRCISES – FRONT SQUATS
- Training Tips for Front Squats
- 13. GOOD MORNINGS
- 14. BACK EXERCISES – SEAL ROWS
- Back Exercises
BACK EXERCISES
Browse through the article for inspiration on how to add variety and depth to your training, and strengthen and develop your back in new ways. Good luck and have fun.
BACK MUSCLES
Latissimus Dorsi
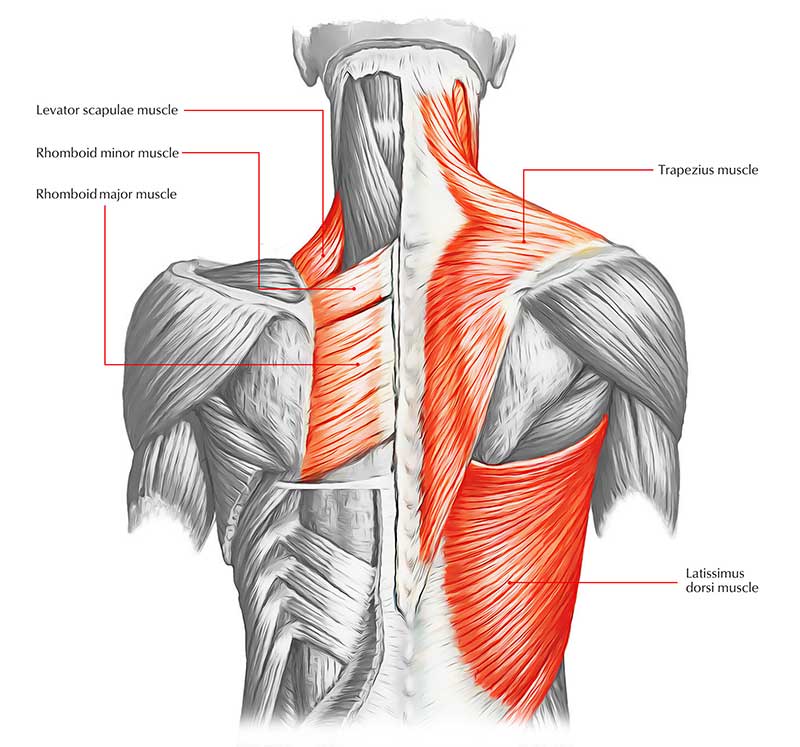
Often referred to as the “lats”, latissimus dorsi are often the back muscles that are most thought of when we train the back. The lats run from the base of the spine and fan out across the entire back, in the V-like pattern on the diagram above.
These muscles are responsible for strength throughout most pulling movements such as pull ups, deadlifts, and weighted carries. The lats give the back a wide V-shape. In bodybuilding this is known as a V-taper.
Trapezius
Also known as the “traps”, the trapezius controls scapular movement and assists pulling movements like shrugs, deadlifts and power cleans. Although many people think of the traps as the top of the back/neck because of the way they appear, this muscle group actually spans from the upper back/neck all the way down to the lower regions of the back.
Rhomboids and Levator Scapular Muscles
The rhomboids and scapular muscles are responsible for shoulder blade control and stability. These muscle groups are key for most pulling and pressing movements, and can be trained using traditional back exercises as well as scapular push-ups, banded drills, and other direct scapular strengthening exercises.
Erector Spinae
The erectors, otherwise known as the lower back muscles, are trained throughout most of the movements in powerlifting, weighting, and fitness (deadlifts, cleans, snatches, squats, etc.). They are responsible for spinal stability and resisting spinal flexion; and can be further isolated in moments like back extensions and good mornings.
THE BACK AND THE POSTERIOR CHAIN
The posterior chain is a group of muscles on the posterior of the body from your upper back running all the way down to your calves. Examples of these muscles include the hamstrings, the gluteus maximus, erector spinae muscle group, trapezius, and posterior deltoids.
Some of the back exercises in this article (i.e. deadlift) work the entire posterior chain. Others isolate the back in a certain way (i.e. cable row), allowing you to adapt your training plan to get the results that you want. It is always important to think of the back as an interconnected part of your body in relation to all others, and never solely in isolation.
Combining full body compound exercises such as the deadlift with isolation exercises like the cable row is an effective way to strengthen your back and build a resilient fitness from many different angles.
Why is it Good to Strengthen your Back Muscles with Back Exercises?
A stronger back will help to improve posture, reduce the risk of injury, especially to the spine and help protect you against back problems later in life. It will improve your general pulling and pushing strength.
BACK EXERCISES
Add these into your training.
1. DEADLIFT
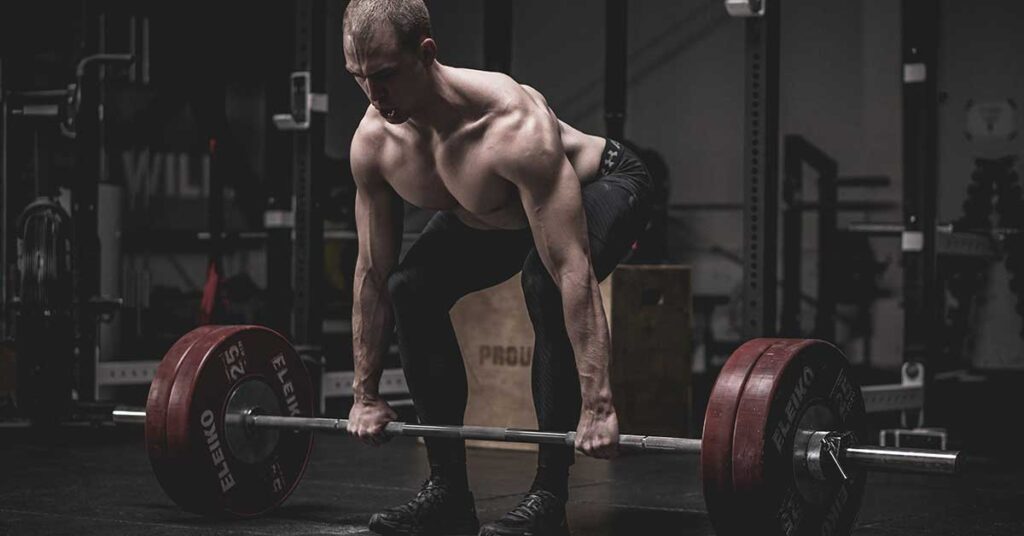
As back exercises go, the Deadlift is a fundamental, full body multi-joint compound training exercise designed to build absolute strength. If you could only do one back exercise, do deadlifts.
Benefits of the Deadlift
Burn fat: deadlifts facilitate the rapid burning of body fat
Pack on full body strength and muscle – deadlifts engage all the major groups of muscles of the body. Not only do deadlifts work out the upper body and back, but also the lower body and entire posterior chain. If you have no time to do many different exercise, this one will suffice
Improve posture: deadlifting will significantly enhance core stability, strength and posture
Target and strengthen the core: deadlifts help sculpt and tighten up your entire core section, upper and lower abs, obliques.
Deadlifts also enhance grip strength, increases testosterone levels, strengthens joints and ligaments, slows down the aging process and counter depression and anxiety.
How to Deadlift
- Setup: Stand with your mid-foot under the bar. Your shins shouldn’t touch it yet. Put your heels hip-width apart, narrower than on squats. Point toes out 15°
- Grip the bar: Bend over without bending your legs. Grip the bar narrow, about shoulder-width apart (similar to the Overhead Press). Your arms must be vertical when looking from the front
- Set up position: Drop into position by bending your knees until your shins touch the bar. Do not let the bar move away from your mid-foot. If it does, start again from step one
- Lift your chest: Straighten your back by raising your chest. Do not change the rest of your position. keep the bar over your mid-foot, your shins against the bar, and your hips exactly where they are
- Breathe then pull: Inhale and brace your entire body. Pull the weight off the floor and stand up with the weight. Keep the bar in contact with your legs while you pull. Don’t shrug or lean back at the top. Lock your hips and knees to full extension
- Hold the weight for a second at the top, with locked hips and knees. Then return the weight to the floor by moving your hips back while bending your legs. Exhale.
- Pause at the bottom and repeat
Training Tips for Deadlift Technique
Grip
Depending on your goals, you can grip the barbell in a variety of different ways when it comes to deadlifting. It is good to experiment with all of these methods. Grip strength often becomes a factor that can limit the deadlifting capabilities of an athlete.
Double overhand grip (pronated grip): The hardest grip and the most demanding. This will significantly improve grip and forearm strength.
Mixed grip: This means one hand grips facing the body (pronated) and the other hand faces away from the body (supinated). This is the most common grip and will allow you to lift more weight that the double overhand grip before your grip strength fails you.
Double overhand grip with deadlifting straps: Deadlifting straps eliminate grip strength becoming the reason that you can’t deadlift the weight. They are a great tool when you get up to 85 – 100% of your one rep max (the maximal amount you can lift for a single). Don’t always use straps as your grip strength itself will suffer. Be intelligent and honest about when you really need them. If it doubt, don’t use them.
Double overhand hook grip: This method is popular with Olympic weightlifters, CrossFit® and functional fitness athletes. It originates from Olympic weightlifting. The thumb is placed against the bar and the fingers are wrapped over the top to crush it and the barbell in place. It is highly effective and will allow you to lift more weight, but it is a technique that takes time, practice and mental strength to get right.
Movement and Bar Path
Never bend your elbows during any part of the lifting motion.
Keep your entire back in a neutral position (the normal inward curve) at all times. If the back rounds then stop immediately and lower the weight. Do not accentuate in the other direction and arch your back too much (hyperextend).
Keep your head inline with the rest of your spine, don’t look up, don’t look at your feet either.
Way up: don’t jerk the bar off the floor, pull slowly while dragging the bar over your legs
Way down: hips back first, bend your legs mostly once the bar reaches your knees
Push your knees to the sides on the way up, lock them at the top
Deadlift Variations
- Rack Pulls
- Sumo Deadlift
- Romanian Deadlift
- Trap Bar Deadlift
- Kettlebell Sumo Deadlifts
2. PULL UP
Benefits of the Pull Up
Pull ups strengthen and develop the lats, teres major, triceps, biceps, pecs and posterior deltoids. Depending on the pull up variations your use, different muscles will be tested, strengthened and developed in various ways.
Pull ups build considerable back and upper body strength and have a wide functional application over into other sports, such as climbing and OCR, and bar-based movements such as muscle ups and kipping pull ups. They are one of the best back exercises to use to build bodyweight strength.
The ability to move and control one’s body in space, during movement and exercise, is a key attribute some lifters fail to attain. Increased midline stability and body awareness (proprioception) are just a few more benefits of mastering one’s bodyweight in the pull-up.
How to do Pull Ups
- Grip the bar about shoulder-width apart. Full grip with your palms facing forward (supinated)
- Hang with straight arms
- Inhale and brace your core, glutes and back. Grip the bar as tightly as you can
- Pull yourself up by pulling your elbows down to the floor. Keep your elbows close to the body
- Pull yourself all the way up until your chin passes the bar. Don’t do half reps unless you are working on progressions
- Repeat. Lower yourself all the way down until your arms are straight. Breathe out
- Your build determines your grip width for Pullups. The wider your shoulders, the wider your grip should be
- Each rep must start with your elbows locked at the bottom, and end with your chin over the bar at the top. Don’t do half reps or you will get half the gains. Always use the full range of motion.
Training Tips for Pull Ups
Raise your chest. Lead with it on the way up. Try to touch the bar with your chest.
Head. Keep it neutral. Look forward. Don’t look at the bar. Don’t reach for it with your head.
Lower Back. Stay neutral. Straight line shoulders to knees. Don’t over-arch your lower back.
Pull Up Variations
- Chin up: Grib the bar with a shoulder width underhand grip (pronated).
- Neutral grip pull up: Grip the parallel handles of a pull up bar so that your palms are facings each other.
- Mixed grip pull up: Place your hands shoulder-width apart then use an underhand grip with one hand and an overhand grip with the other.
- Towel pull up: drape two towels over the pull up bar at the points where you would usually grip the bar. Grab the ends of the towels so that your palms are facing each other. Perform the pull ups whilst hanging from the towels. Grasping the towels engages more of your forearm muscles and improves the endurance and strength of your grip.
- Isometric pull up: Firstly, perform a pull up, but then hold your chin above the bar for 10 to 15 seconds. Try this for several reps or on the last rep of your last set of pullups.
3. BACK EXERCISES – SINGLE ARM DUMBBELL ROW
Benefits of the Single Arm Dumbbell Row
The single arm dumbbell row is a great accessory back exercise that increases upper body strength in the back and shoulders, and to a lesser degree, the musculature of the upper arms and forearms.
This back exercise will enhance core strength in the erectors, scapula stabilizers, and the anterior core, as well as developing the lats.
This is one of the most effective unilateral back exercises you can utilise.
How to do Single Arm Dumbbell Rows
- Place a single dumbbell on the ground on the right-hand side of to a bench.
- Place your left knee on the bench with your right leg planted firmly on the right hand side behind the dumbbell
- Bend at the hips, keep your back straight and place your left hand on the bench. Your right arm will now be able to extend down and pick up the dumbbell
- With the dumbbell in your grip and your arm in a full hang position, inhale and brace your core, glutes and back.
- Pull the dumbbell up to the side of your torso without rotating your shoulders or losing balance. Pause for a count at the top before lowering the weight back to the starting position. Repeat for the prescribed number of reps
- Swap the dumbbell to the left-hand side of the bench and mirror your movements for the next set
Training Tips for Single Arm Dumbbell Rows
You must keep the back straight and not curved over and the shoulders square throughout the exercise.
You should not raise the weights beyond the line of the shoulders.
Do not lift heavy weights with this particular exercise unless you are experienced and trust your strength, shoulder joints, and back.
Do not bend the wrist excessively up, down, or to the side.
Check out these Bicep Exercises to build stronger and more muscular arms
4. BACK EXERCISES – RENEGADE ROWS
Benefits of Renegade Rows
Unlike many rowing variations and back exercises that focus primarily on the upper back and lats, the renegade row provides a solid stimulus the core as well.
On top of producing a strength stimulus for multiple muscle groups, the renegade row is also a useful tool for improving midline stability and coordination when moving external loads.
The renegade row is a great back exercise to strengthen the upper back and lats due to its primary movement pattern (the row). When supplemented into programs, the renegade row is an effective tool for accruing extra pulling volume to produce hypertrophy without overloading the back with excessive amounts of weight.
How to do Renegade Rows
- Grab a pair of light dumbbells and about as much space as you would need to perform push ups
- Get into a plank position with your feet spread wide and grip the dumbbells with your palms facing parallel to each other
- Squeeze your glutes and core to maintain a strong spinal alignment. Keep your head in a neutral position looking at the floor ahead of you
- Use your lats to row one of the dumbbells to chest height, then return the weight to the ground
- Control the load up and down the movement
- Perform a single push up with your hands gripping the handles of the two dumbbells. Maintain a braced neutral spinal position
- Repeat the motion with the opposite arm
Training Tips for Renegade Rows
If you cannot complete the reps without contorting your body then use a lighter weight.
Keep your core braced and tight at all times.
5. BACK EXRCISES – BARBELL ROWS
Benefits of Barbell Rows
The barbell row is one of the most effective barbell back exercises that works strength and muscle growth in your lower, middle and upper traps, rhomboid major, rhomboid minor, rear deltoids, and rotator cuff muscles.
How to do Barbell Rows
The barbell row starts with the bar on the floor. And the bar returns to the floor on every rep.
Don’t hold the bar in the air between reps (these are a different exercise named Yates Rows). You should pull from the floor so that you can set your lower back in the neutral position, breathe and use your hip muscles pro perly for every rep. Proper form for Barbell Rows is similar to Deadlifts in the same way that each rep starts and ends on the floor.
- Stand with your mid-foot under the bar. Don’t touch it with your shins. Adopt a medium, stable stance with your toes pointing outwards slightly
- Grip the bar with a shoulder width grip. Narrower than on bench press, wider than on deadlifts. Hold the bar low in your hands
- Unlock your knees. Keep your hips higher than on the Deadlift. Bend your knees but keep them back so the bar won’t come into contact with them during the movement.
- Lift your chest. Straighten your back. Don’t move the bar. Don’t drop your hips. Don’t squeeze your shoulder-blades together
- Take a big breath, brace your body and pull the bar against your lower chest. Lead with your elbows and pull them to the ceiling
- Return the weight to the floor
Training Tips for the Barbell Row
You can raise your torso slightly at the top to lift heavier weights but make sure your barbell rows don’t turn into deadlifts.
A good indicator is that if your torso rises more than 15° above parallel during the lift, then the weight is too heavy.
Drop the weight and concentrate on building up strength and technique.
6. BACK EXERCISES – RING ROWS
Benefits of Ring Rows
Ring rows are one of the most effective back exercises to develop core, back and upper body strength and muscle along with balance and coordination. They can be scaled appropriately for beginners or offer an alternative challenge for even the fittest athletes.
Using rings increases the stability, core strength, and body awareness required to stabilise the body throughout the full range of motion. In addition, the exercise works unilateral strength and stability simultaneously, as both rings move independently from each another.
How to do Ring Rows
- Grip the rings with straight arms, inhale and brace your core. Your feet are the only points in contact with the ground
- Pull your shoulder blades back to start the rep, then pull up with your arms to lift your chest to the rings
- Keep your wrists stable and maintain a straight line in your spine, squeezing your glutes
- Touch your chest to the rings straightening your arms to return to the starting position
- Training Tips for Ring Rows
- The lower your body is to the floor when performing this exercise, the harder it will be.
- Alter your grip to achieve a new training stimulus
- If the movement is far too easy for you then try them using a single arm.
- You can add isometric holds to this movement for another good challenge that will test and improve your strength and muscles.
7. T BAR ROW
Benefits of the T Bar Row
The T bar row is one of the best accessory back exercises that will develop and build your latissimus dorsi. Additionally, this isolation exercise works all the major back muscles – teres major, trapezius and erector spinae. The movement also works the shoulders and the pulling muscles in your arms — biceps, brachialis, and brachioradialis.
One of its advantages is that the movement is not dependent on the lower back. The T-bar row minimizes strain on the lower back as the lifter is not supporting their own weight and the barbell in the bent over row position.
By using this chest supported row variation, a lifter can solely focus on training the upper and middle back with high loads and volume. Lifting the weight from a chest supported position allows the lower back, hamstrings, and hips to not become limiting factors. This is useful because lifters can target their upper and lower back without adding additional stress to the lower body.
How to do T Bar Rows
The instructions below are for lifters that do not have access to a landmine unit or a T bar row machine. If you do have access to these things continue from point 6 after you are already in the set up position.
- Place the end of an empty barbell into the corner of a room
- Rest a heavy dumbbell or some weight plates on top to hold it in place
- Load the opposite end of the bar with plates and stand with one foot on either side of the barbell. Shoulder width apart. Point your toes out slightly
- Bend over at the hips until your torso is about a 45-degree angle to the floor. Extend your arms
- Hook a V-grip handle (the kind you see at a cable station) under the bar and grip with both hands
- Inhale and brace your core, glutes, back and grip
- Keeping your lower back in its natural arch, squeeze your shoulder blades together and pull the bar upwards until the plates touch your chest
- Lower the weight to the floor. Repeat for the programmed number of reps
Training Tips for T Bar Rows
The T bar row is considered to be a very safe back exercise so use it to build confidence as well as strength and muscle if you are relatively new to lifting.
The T bar row is an excellent accessory exercise to accompany the compound barbell back exercises like the barbell row.
If you enjoy combining push/pull movements in your training, combine T bar rows with bench presses for a great upper body pump and challenge.
8. BACK EXERCISES – LAT PULL DOWN
Benefits of Lat Pull Dows
The lat pull-down is a cable-based exercise on a machine that’s ubiquitous in gyms all around the world. Easy to learn and highly effective, it targets the latissimus dorsi muscles. The cable allows for continuous time under tension, making it an effective it effective for muscle growth (hypertrophy). It is not difficult to learn how to use, so can be easily inserted into any training program.
How to do Lat Pull Downs
- Grasp the bar with a wide overhand (pronated) grip. Other positions and grips are possible but start with this standard position
- Inhale and brace your core
- Keep your feet flat on the floor and engage your abs as you pull
- Pull the bar down until it’s approximately level with the chin
- Squeeze the shoulder blades together while maintaining square shoulders
- From the bottom position with the bar close to your chin, slowly return the bar to the starting position and control its gradual ascent
Tips for Lat Pull Downs
The bottom of the motion should be where your elbows can’t move downward any more without moving backward. Be sure to stop at that point and do not go lower.
While shifting just slightly backward is OK, aim to keep your upper torso stationary.
Control all parts of the entire range of motion and don’t smash the weight plates into each other.
Vary the width of your grip to stress and strengthen you back and lats in different ways.
9. SEATED CABLE ROWS
Benefits of Seated Cable Rows
Seated cable rows primarily target and develop the lats. Secondarily, the trapezius muscles, the erector spinae, rear deltoids, biceps, biceps brachialis, and the forearms are also worked considerably by the movement.
Cable movements provide constant time under tension throughout the entire movement. This allows you to work both the concentric and eccentric portions of the exercise. More tension translates into more muscle activation.
The variety of seated cable row exercises at your disposal are almost limitless. Having a range of different attachments will keep your workouts fresh as well as providing new stimuli for your back, core and upper body.
How to do Seated Cable Rows
- Attach a straight bar to a cable station. Sit on the bench and position yourself with your feet braced.
- Grab the bar using an overhand (pronated), shoulder-width grip, and sit upright
- Inhale deeply, brace your core, glutes, back and grip
- Pull the bar to your upper abs
- Pause, then slowly return the bar back to the starting position
Training Tips for Seated Cable Rows
Your torso should remain straight and motionless throughout the movement. Don’t lean forward and backward to perform the exercise. If you do find that the weight is throwing you out of control, use a lighter weight and progress once you are strong enough to control it through the full range of motion.
10. BACK EXERCISES – WEIGHTED CARRIES
In its simplest form a weighted carry is simply picking up something heavy then walking it from one point to another.
“The loaded carry does more to expand athletic qualities than any other single thing I’ve attempted in my career as a coach and an athlete.” Dan John
These are often seen in strongman/woman competitions but rarely utilised by many other gym goers and athletes. Truth is, as full body and back exercises go, they are hugely undervalued and should be added into your training, whatever training discipline or sport you prefer.
Carrying and holding awkward, heavy objects and loads stresses and improves different movement patterns and muscles than lifting heavy barbells. Take the deadlift for example.
With this movement the muscles you use will be the same every time you perform the exercise. Not so with carrying a heavy load. When you carry a heavy sandbag or a tree stump your body must stabilise and brace itself with every step, as well as controlling and handling the shifting, uneven weight of the object. This is especially true when you’re carrying an “odd” object, something that’s not uniform in size, shape, and/or density.
Benefits of Weighted Carries
Increased grip, back, core and arm strength and postural control are all training benefits of loaded carries. This makes each variation of this movement highly functional for movement and daily life in general.
Weighted carries (unilateral, bilateral, or asymmetrical) will increase postural control and core stability, both of which are necessary for more advanced training and lifestyle demands.
Loaded carries allow us to use heavier weights than we can perform with other movements. By using these heavy loads, we can subject the back and body to greater demands and time under tension stress, both of which will increase overall strength and hypertrophy. This can also increase confidence in your own abilities. Once you know you can lift and carry X kg for ten metres, then it can help to shift your perspective for maximal loads on other loads.
How to do Weighted Carries
With odd objects you must adhere to the basic principles of good form. Keep your back straight, your core tensed and grip as tightly as you can. Make sure that you are in control of the movement at all times.
There are many variations for weighted carries, so here we will cover the basic technique for farmer’s walks.
Dan John refers to the farmer’s walk as the “King of Carries.” Here is his advice on how to correctly perform the Farmer’s Walk.
- Centre yourself: Make sure your hands are central on the grip. Being a little out of position with the hands can translate into the weights tipping forward or backward substantially. At best, this will tire your grip as you try and get balanced. At worst, one side of one or both of the walks will hit the floor and bring you to a dead halt.
- Get solid: Once you centre yourself, get solid through your whole body. Squeeze the glutes and brace the core. Get the chest up and sit your weight through the heels. Drive through the floor to pick up the weight.
- Get tall and straight: Get tall by standing up, making sure the hips are open and the shoulders are pinned back. Get straight by making sure standing does not end up looking like hyperextension through the back. Squeeze the glutes and tuck your ribcage in to straighten up. Look straight ahead.
Small, fast steps – Taking small steps will help to stop the equipment from swinging by your side. Move the feet quickly!
Training Tips for the Farmer’s Walk
If you have never tried any type of weighted carries before then start light and get used to the movement. At the same time, don’t be scared to load up the weight and test your limits. Considering that the farmer’s walk is initiated by picking something off the ground, the obvious reference point for most people is the deadlift. However, don’t let this limit you. When it comes to how much you can lift with a farmer’s walk, it’s likely you’ll be able to pick up and move with more than you can deadlift. Try the following rough measurements as reference points:
- 0.75 x bodyweight in each hand is a good starting point for both men and women
- Bodyweight in each hand is a great aim and very achievable
- Being able to do 1.25 x bodyweight will put you well above the majority
- 1.5 x bodyweight in each hand is exceptional
11. KETTLEBELL SWINGS
Benefits of Kettlebell Swings
The kettlebell swing is an incredibly physically demanding exercise that tests and improves your your core stabilizer muscles, back, arms, legs, delts, hamstrings, glutes and grip strength. They build explosive power and can be programmed to enhance strength under fatigued conditions, power and/or pure strength.
Kettlebell swings are also a great way to break up the monotony of regular training, burn fat and improve balance and stability. In short, they are a vastly underutilised training tool that everyone should introduce into their fitness.
Russian Kettlebell Swings
Russian Kettlebell Swings finish each swing at eye level.
American Kettlebell Swings
America Kettlebell Swings finish at full extension over the head.
How to do Kettlebell Swings
A great way to understand the movement is to think of the kettlebell swing exercise in its simplest form, as a dynamic hip hinge. Keep the shoulders above the hips, hips above the knees. Make sure to maintain a neutral spine.
Below are instructions for the Russian Kettlebell Swing. Simply change the height that you swing the Kettlebell in order to perform the American Kettlebell Swing.
- Place a kettlebell on the floor in front of you
- Keeping a straight spine, bend over by hinging at the hip and grip the handle of the kettlebell with both hands
- Inhale and brace your core, glutes and grip on the kettlebell
- From a sumo deadlift stance, “hike pass” the bell back between your legs until your forearms make contact with your inner thighs
- Explosively thrust your hips forward, launching the bell to your chest level. Don’t try to lift it with your traps or your back
- Cramp your glutes on the top of each rep
- Guide the kettlebell back between your legs for the next rep
- Do all the reps without setting the bell down
Training Tips for Kettlebell Swings
Keep the heels, toes, and balls of the feet planted on the floor at all times.
The arms should be straight in the bottom position.
Ensure there is no forward knee movement on the upswing.
The body forms a straight line at the top of the swing: the hips and knees must be fully extended.
Sharply inhale through your nose on the way down, exhale on the way up.
Contract the abs and glutes at the top of the swing.
Control the weight throughout the entire range of motion.
12. BACK EXRCISES – FRONT SQUATS
Benefits of Front Squats
The front squat is a highly effective core, leg and glute exercise; however, it may seem odd to make it as part of article that focuses on back exercises. I included it because this movement fixes the barbell and load into the front rack position and causes a unique training stimulus for the back as well.
Front squats recruit the muscles of the upper back and forces thoracic extension in order to hold the bar on the shoulders. It is a great way to test and improve upper back strength and mobility.
Because the front squat requires the load to be place on the front of the body, resting on the shoulders, it means that any forward torso lean will cause the barbell to fall and the rep to fail. This upright torso position places less of a shear force on the spine and therefore makes it a better option for those with back issues.
How to Do Front Squats
- Rack the barbell securely on your upper chest and shoulders and keep your elbows high. Place your hands shoulder width apart and push your chest to the ceiling. This helps to keep the trunk vertical and will also increase the rigidity of your upper back
- With the bar secured properly on your shoulders, take three steps backwards in a slow and steady manner
- Establish a stable tripod foot. Roughly shoulder width with toes pointed out slightly
- Squeeze your glutes to generate external rotation torque at the hips
- Inhale and tense your core
- Look straight ahead or slightly upward during the entire movement. This will keep harmful forces from being placed on your neck during the lift.
- Hinge at the hips by moving them back slightly. This will engage the posterior-chain. Keep the trunk in a vertical position
- Descend and remain balanced by keeping the bar over the mid-foot during the entire squat
- Stand straight up from the bottom position while maintaining an upright chest position. Keep the elbows raised high at all times
Training Tips for Front Squats
Many people find that when they are tested, the ratio between their front squat and back squat are off. The ratio should sit at around 85%. The front squat recruits more quadriceps and the back squat is a more posterior dominant movement. If your front squat is below 85% of your back squat then you need to add more front squats and quad dominant movements into your training.
Always keep your elbows as high as possible! Allowing the elbows to slip into a low position can lead to a rounded upper back. This greatly increases the odds of dropping the weight and injury as it gets heavy.
Mobility issues at the shoulder and/or upper back (thoracic spine) can be a problem when it comes to reaching the high elbow position. If you can’t grip the barbell with a fully closed fist and maintain the high elbow position then use an open palm whilst keeping your fingers in contact with the barbell.
13. GOOD MORNINGS
Benefits of Good Mornings
Good mornings are among the most fundamental lower back, hamstring, and glute accessory exercises done by powerlifters, Olympic weightlifters, Strongman, and functional fitness athletes.
The good morning is an exercise that strengthens many muscles that make up the posterior chain including the glutes, hamstrings, spinal erectors, back and scapular stabilizers.
How to do Good Mornings
- Rack the barbell on your back in the same way you would for a back squat
- Stand straight with feet hip-distance apart
- Inhale and brace your core glutes and grip on the barbell
- Hinge forward slowly from hips. Control the movement
- Push the hips back. Keep the knees slightly bent
- Lower torso until your spine is almost parallel to floor, maintain a neutral spinal position
- Keep your core engaged, lift torso to return to starting position
Training Tips for Good Mornings
When you hinge forward to start the movement, imagine you are trying to close a door with your glutes. This is a coaching cue that will keep you in the right position throughout the entire range of motion.
Never let your back round! This movement places a lot of strain on your back and posterior chain (which is what makes it effective) but build up the weight slowly over time. This is not a lift that you are trying to PR in the same way you would for a squat, bench press or snatch. Stay controlled, safe and tight at all times.
14. BACK EXERCISES – SEAL ROWS
Benefits of Seal Rows
The seal row is an excellent exercise that targets the upper back, and specifically isolates the lower lats. Easl rows force and teach any lifter how to fire their lats and concentrate on this muscle when lifting. It is an incredibly effective accessory back exercise that will reveal weaknesses in back strength.
They’re called “seal” rows because of how the legs tend to flap up and down as you pull the weight up, especially when it gets heavy.
How to do Seal Rows
- Lay face down on a flat bench with your arms fully extended beneath you. Grip the barbell.
- Inhale, squeeze the glutes and brace the abs. This will help prevent any hyper-extension of the lumbar spine
- Think about pulling your elbows towards the hips. The barbell should be more or less be in line with your belly button
- Pull the barbell all the way up until barbell touches the bench. Keep going until you hear the sound of metal on metal
- Lower the barbell to the start position and repeat
Training Tips for Seal Rows
Always create a set-up that allows you to fully extend (straighten out) your arms once you are laying on top of the bench. If this is not on a bench made specifically for seal rows then you may need to place a bench on boxes to achieve the right height. There should be enough room for the shoulder blades to move around the thorax/rib cage.
Try to keep the neck packed (make a double chin) throughout the full range of motion.
To make the lift harder, lift the legs off the bench via the glutes (hip extension) and hold that position throughout the entire lift.
Back Exercises
The back exercises in this article will help you to develop a strong and powerful back. This aspect of your fitness is essential for helping to negate the risk of injury, countering the effects of bad posture and has huge crossovers into many other outdoor fitness activities such as climbing, trekking and kayaking. A strong back is an essential component of every fit and functional human’s life.
Want to develop the rest of your body as well? Learn how to build stronger, more muscular and functional shoulders and arms.

Comments are closed.